![]()
I started in photography as a stepping stone into digital art. As with most photographers, I started taking pictures of everyone and everything. It was not fun hiking with me; I was the guy stopping every five minutes to take pictures of trees and rocks.
During that time I was mesmerized by 3D artworks and by the incredible landscapes and props other artists were creating. Even though I was eager to start creating 3D artworks, the technical difficulty and the steep learning curve kept me from it. Or at least it was a good excuse. But then… the donut tutorial came out, and then, everything changed.
We’ll it sounds a bit dramatic, but it really was a good starting point to start delving deeper into 3D.
I’m a Photographer, Why Bother Learning 3D?
You might ask: if there are millions of stock images on the Internet, some free and some paid, why should I bother learning 3D if you just want to make a composite in Photoshop?
Even more, why even bother if you can take the pictures yourself? I mean, you already have a super-mini-computer in your pocket. If you are a bit fancier, you might have a proper camera already.
Well, there are multiple reasons:
1. Your imagination and vision are unique and the images required to create that composite you are dreaming of might not be easy to find.
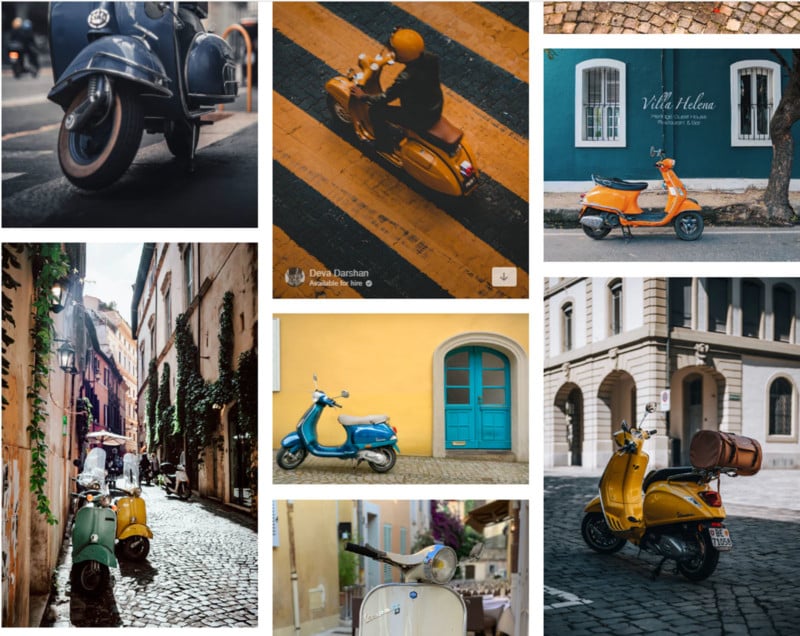
2. Take a look at my search for Vespa motorcycles. There are thousands of Vespa pictures, but none are placed at the correct angle, and even more important the lighting conditions are nothing close to the original photo.

As you can see from this screenshot, it would be very difficult to get the exact model in the right lighting and the perfect angle. Evidently, you can always Photobash it but the results would most likely look forced in most cases.
Do I Need to Model Everything from Scratch?
As a photographer or digital artists, we mostly enjoy the creative process. Learning 3D can be quite enjoyable, but some technical aspects might discourage you from learning it. If you want total control of the creative process, some technical aspects are unavoidable. But when you simply want to get your feet wet in 3D, there are shortcuts we can use (without remorse).
You Can Use Free Models
The good news is that many sites offer good-quality models for almost any object you can think of. Even better, there are available 3D scanned objects with a superior level of realism for free.
- Free3D
- Sketchfab
- Blend Swap
- Quixel Megascans: Photo scanned objects with exceptional quality.
- Scan the World: It has a section with photo scanned models for art pieces. Highly recommended.

You Can Create With the Most Simple Tools
Like many artists, we are proud of ourselves if we create everything from scratch. Even if that means producing only one piece a year. It is a common curse that gets repeated in every podcast or blog for artists. If this is the case for you, there are also options to create without being extremely technical or proficient in 3D.
![]()
The room itself is a cube with a couple of holes for the windows.
![]()
The cardboard plane — well, it is a complex design with engineer-designed aerodynamics. After long hours of modeling, I managed to simplify it into a cube with wings. I’m serious.
![]()
Paper planes: A single plane with two cuts in the middle and minor adjustments. Even though it is an extremely simple process, our brains connect the dots and interpret it as we wanted to.
I hope this little article of mine was useful somehow. If it wasn’t, I encourage you to go download Blender and start exploring, the only real limitation is your imagination. If you want to reach out with some questions feel free to drop a comment below.
The gallery below contains my favorite images done with Blender. I hope there’s something you like.
![]()
![]()
![]()
![]()
![]()
![]()
![]()
P.S. I’m working on a comprehensive mini-course on Blender. You can join the waitlist for when I release my course here.
About the author: Nick Ramirez is a self-taught photographer and digital artist with a vivid passion for all things visual. The opinions expressed in this article are solely those of the author. You can find more of Ramirez’s work on his website. This article was also published here.
No comments:
Post a Comment