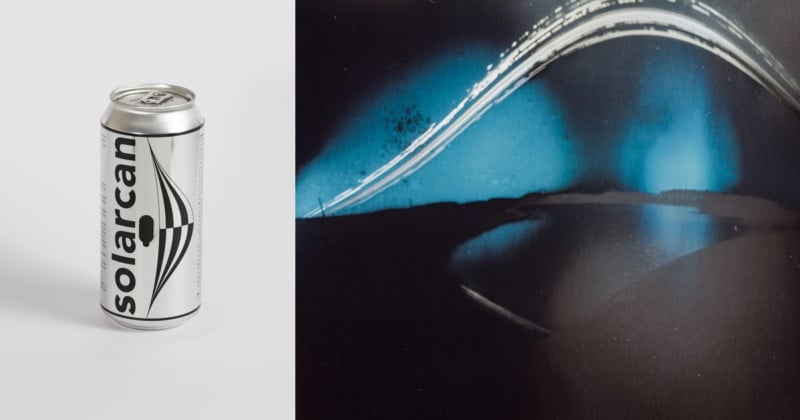
Solarcan has announced Puck, a smaller limited-time version of its soda-can-shaped Sun-catching camera. The new model comes shaped like a circle and produces round instead of more traditional rectangle images.
Solarcan, created by photographer Sam Cornwell, specializes in producing solargraphy cameras that don’t require any DIY skills. Anyone can use them without knowing a single thing about pinhole cameras, development, or even solargraphs.
The original Solarcan announced in 2017.
The company released its first model in 2017 on Kickstarter. Since then, it has also added a set of tinted Solarcans that produce vibrant and colorful results, and now — the small and round Puck.
Once an exposure is started, the Solarcan Puck will capture the Sun’s path and produce a photo that can be retrieved inside afterward. The resulting image is inverted and can be scanned or photographed to get a digital copy.
To produce an image, photographers have to firmly fix the camera to a chosen outdoor location. The exposure begins when the tab inside is removed to allow light to pass through the pinhole.
The photographic paper inside the camera only reacts to sunshine, so photographers don’t have to worry about light pollution from street lights, the Moon, or other sources.
The new Puck works the same way as its predecessor model, except it catches a circle image. The new camera also comes with three exposures. Each next exposure is revealed after removing the cover sheet and gives photographers three goes to experiment with.
As the camera has no viewfinder, it can be tough to figure out the best camera placement for a good composition. The company recommends turning to community results to get ideas for this.
Below, the company has shared a few mock-up images of what the results shot by Solarcan Puck could look like.
Solarcan has no plans to sell the Puck as a standalone product — it will instead be bundled with orders of over £30 ($40) for Black Friday weekend through November 28th.
“I’m not planning on making it a future product or selling it,” Cornwell tells PetaPixel. “It’s intended as a bit of fun for the community, hence I’m not putting a price tag on it. I’m just excited to see what people produce with it!”
Sharbat Gulla, the Afghan woman made famous by photographer Steve McCurry’s iconic Afghan Girl photo, has escaped the Taliban in Afghanistan and has been evacuated to Italy.
The 49-year-old Gulla, also known as Sharbat Bibi, received international attention as a young girl after photojournalist Steve McCurry photographed her at the Nasir Bagh refugee camp in Pakistan while Afghanistan was occupied by the Soviet Union. The striking portrait was featured as the cover of National Geographic in June 1985 and quickly became one of the most widely recognized portraits ever captured.
In 2016, Gulla found herself in legal trouble after she was found using fake documents to obtain a Pakistani identification card under the name “Sharbat Bibi.” As a result, Gulla was deported from Pakistan back to Afghanistan.
During this time, McCurry expressed his willingness to do everything possible to help her as Afghanistan’s then-president Ashraf Ghani welcomed her back to her birthplace and promised to provide her with a place to live, reports National Geographic. Ghani also promised that her children would have access to health care and schooling.
“I’ve said repeatedly, and I like to repeat it again, that our country is incomplete until we absorb all of our refugees,” Ghani said during a small greeting ceremony.
Upon her arrival back to her home country, Gulla lived with security precautions due to her identification as the subject on the cover of National Geographic. Gulla has reportedly faced risk from conservative Afghans who don’t believe women should appear in the media.
After the Taliban takeover of Afghanistan in the summer of 2021, Gulla has now been displaced once more. The Italian government confirmed her arrival in Rome this week after the office of Italian Prime Minister Mario Draghi organized the evacuation.
The rescue operation was part of a program to support Afghan citizens, and Italy is one of several Western countries that have airlifted hundreds of Afghans out of the country. The Italian government also confirmed it will help Gulla integrate into life in Italy.
In regards to the famed portrait, Draghi says the photograph had come to “symbolize the vicissitudes and conflict of the chapter in history that Afghanistan and its people were going through at the time.”
The most fun I have with photography is capturing something I’ve never seen before. Of course, that sets up a lot of pressure to come away with tack-sharp perfect photos. Topaz Labs is how I ensure my success.
Topaz Labs’ most popular Image Quality Bundle includes Sharpen AI, DeNoise AI, and Gigapixel AI normally costs $259.97. But now through Monday, November 29, the company has an even bigger Black Friday discount on the software: the Image Quality bundle can be picked up for $99.99, which is a 60% savings off its regular retail price. If you’re into video work, you can get their “Everything Bundle,” which includes these three photo apps and Video Enhance AI for just $199.98 (normally $559.96). If bundles aren’t for you, you can still get 25% off individual licenses of DeNoise AI, Sharpen AI, and Gigapixel AI. Additionally, Video Enhance AI is available for $99.99, a 67% savings from the regular price of $299.99.
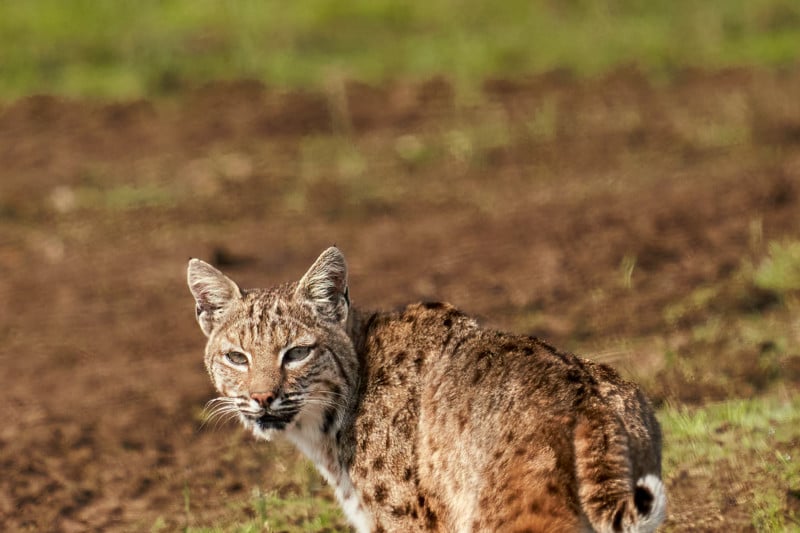
In this article sponsored by Topaz Labs, I want to showcase how I used all three of these applications to enhance one of my wildlife photos. For me, the image of the bobcat I’ll be editing below is exciting as not only was it the first I’d photographed, but the first one I’ve seen in the wild. It’s these kinds of special, personal one-of-a-kind photos that make Topaz Labs products worth every penny because no matter what I walked away with in the field I can fix many issues that may pop up under closer examination.
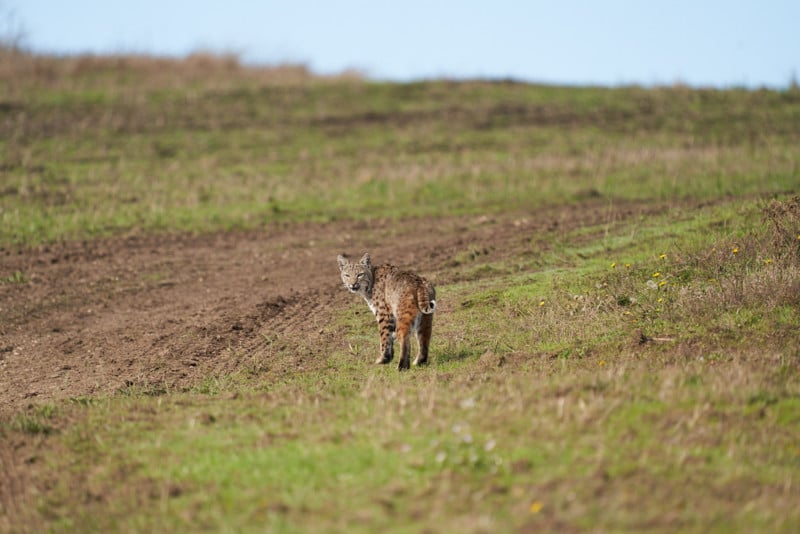
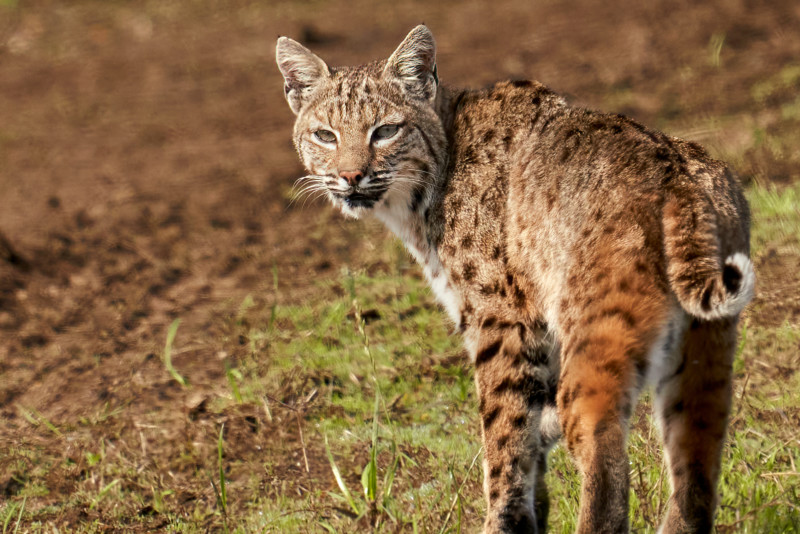
Bobcat straight out of camera photographed with the Sony a7R III and Sony 200-600mm.After editing in Capture One and now ready for enhancement with the Topaz Labs Image Quality Bundle.
The first step was to take care of all the basic adjustments needed inside Capture One. This included a good-sized crop, some work with exposure and creating gradient masks to control the light, plus some color alterations to taste. The “after” shown above is what I came up with, and from Capture One I sent the image file out to Photoshop where I work on finishing and using Topaz Labs Sharpen AI and DeNoise AI as plugins.
Topaz Labs Sharpen AI
The first issue I want to tackle with the image is the soft focus on the animal. This was a completely unexpected sighting taken from a car on the road, and the cat had been already walking down this path by the time I saw it. Between heat haze and some slight motion blur, I know there’s some more detail that can be squeezed out in Sharpen AI.
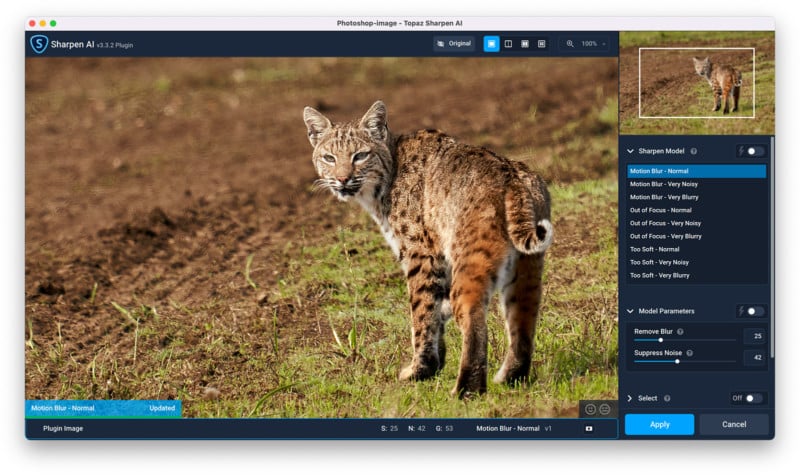
Sharpen AI settings.
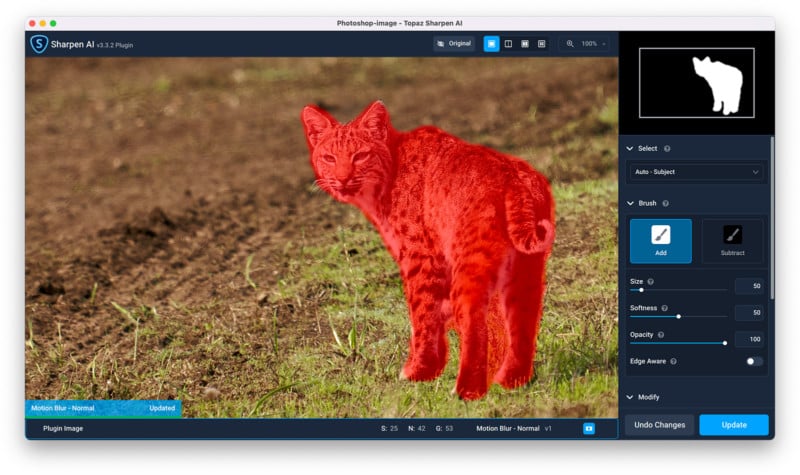
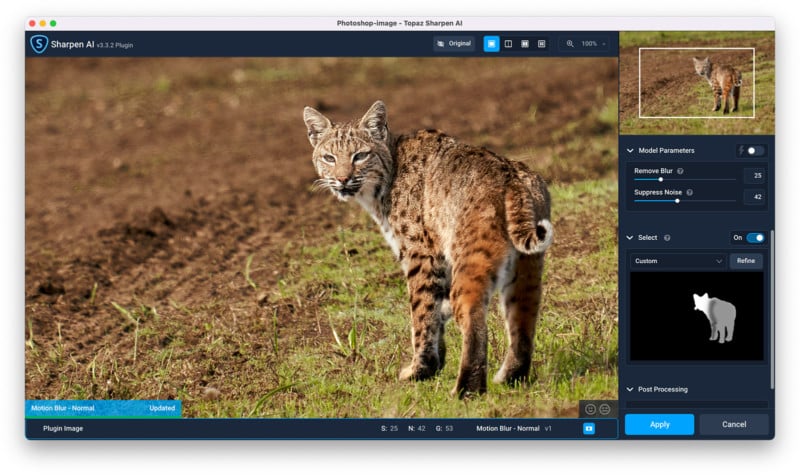
Inside Sharpen AI, the interface is very straightforward. Looking at the side panel, I just go in order of the settings as shown and refine them to taste. First is selecting which Sharpen Model to use. Since this has a little bit of motion blur, “Motion Blur – Normal” seemed to work best on the bobcat’s face which is the most important part of the image.
However, because of the heat haze I mentioned, the out-of-focus areas in the image have some unpleasantly hard-edged bokeh mixed around there. It’s confusing the program as to whether to not it should be enhancing those edges, and in this case, I do not. Simple enough, I can click into the “Select” panel where it automatically masked the bobcat for me almost perfectly. Using a low-opacity brush, I made a couple of tweaks to the mask to control how much sharpening was being applied to different spots around the cat; all sharpening focused on the head with less at the rear end. Now I press Apply which saves the changes to my active layer in Photoshop.
Automatic subject detection masking in Sharpen AI.Final masking tweaks and ready to save out to Photoshop.Before Sharpen AI.After Sharpen AI.
Topaz Labs DeNoise AI
Next, I want to work inside DeNoise AI to deal with the problematic heat distortion. Earlier this week, I detailed in an article how well DeNoise AI combats noise while retaining details. Today, I want to share another way I use it. I’ve found that not only does DeNoise AI do wonders to bring out detail amongst the noise, but it can also help to naturally wash away the areas you don’t want to be detailed — of course, while providing noise reduction at the same time.
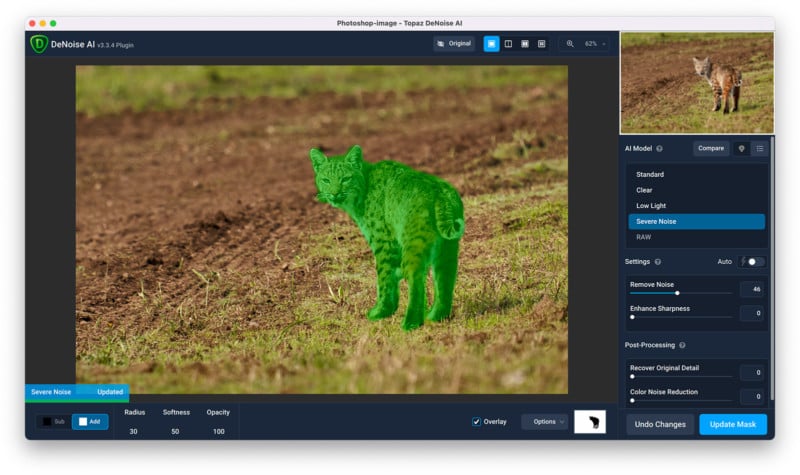
DeNoise AI settings.
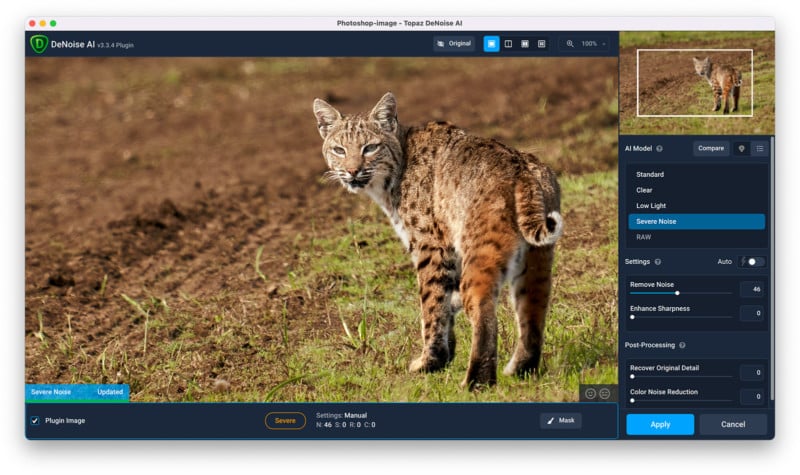
To do this, inside DeNoise AI I’m looking at either Low Light or Severe Noise in the AI Model panel since these two allow for zero sharpening to be applied. Remember, we want to reduce the heat distortion artifacts, not enhance them. With Severe Noise selected, I slide Enhance Sharpness and Recover Original Detail to zero. From here I adjust Remove Noise to taste finding a balance between losing the strange hard edging but not allowing it to get overly smeary.
Surprisingly, doing this did not affect the bobcat as much as I thought it would, but I still went ahead and made a mask on the bobcat and then inverted it so everything in the photo was targeted with noise reduction except the animal.
Masking inside DeNoise AI.Before DeNoise AI.After DeNoise AI, softening the unusual hard edges in the out of focus areas without looking obvious.
Topaz Labs Gigapixel AI
After completing my edits with Sharpen AI and DeNoise AI, along with anything else I wanted to clone or fix inside Photoshop, it’s time to finish this in Gigapixel AI. As we saw at the beginning, the photo was heavily cropped from 42 megapixels down to now 6 megapixels. I really like this image, so I want to put it big on my wall. Enlarging it nearly 6 times so that it’s 60 inches wide and 40 inches tall at 300 dots per inch ought to do it.
Gigapixel AI settings.
Inside Gigapixel AI, I set the Resize Mode to Width and input 60 inches. With the AI Model kept on Standard, it’s that easy to greatly enlarge a photo for printing. Comparing the result from Gigapixel AI to Photoshop, I see much finer details present Gigapixel AI. The application leverages its machine learning to interpret what is being enlarged and can finesse these small details and keep them from aliasing or becoming smudgy. In comparison, the Photoshop result looks blocky and has obviously run up against its limitations.
Enlarged 5.88x to 60×40 inches using Photoshop.Enlarged 5.88x to 60×40 inches using Gigapixel AI.
An Essential Set of Tools for All Photographers
The Topaz Labs Image Quality Bundle features three photo editing applications that I would never want to go without. They have all changed the way I approach both photography in the field and editing at the computer. Disguised by a straightforward interface and simple slider controls, the power and capability within them are well-worth checking out for yourself.
Welcome to a PetaPixel Showcase, in which our staff gives you a hands-on with unique and interesting products from across the photography landscape. The Showcase format affords manufacturers the opportunity to sponsor hands-on time with their products and our staff and lets them highlight what features they think are worth noting, but the opinions expressed from PetaPixel staff are genuine. Showcases should not be considered an endorsement by PetaPixel.
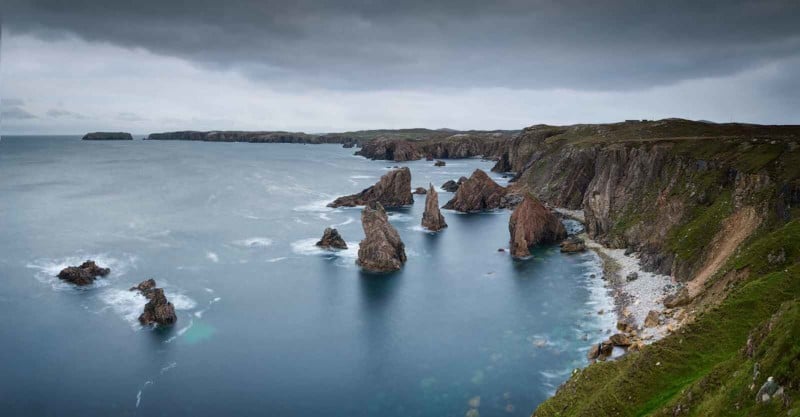
Torridon, Glencoe, and the Isle of Skye have drawn landscape photographers and artists over the centuries. The highlands of Scotland are extensive and uninterruptedly breathtaking – a Big Country indeed. This is the internationally perceived face of Scotland – a meticulously sculpted land of peaks, glens, lakes, and shorelines. And rain or mist to make or break the scene dependent on your disposition.
But distant from the western shore, an extensive string of pearls awaits the more intrepid traveler. The Outer Hebrides stretch for 140 miles – a sliver of land 40 miles away resting on the horizon. They are comprised of the joint isles of Harris and Lewis, North Uist, Benbecula, South Uist, and Barra.
Here is a different Scottish landscape. Pure and wild, beaches to melt a heart, rolling hills and lakes, abandoned homesteads left furnished some 70 years ago – a unique landscape tied to culture. Time slows down out here. The clock ticks to a different beat. There is a softness to the landscape that sways with this rhythm.
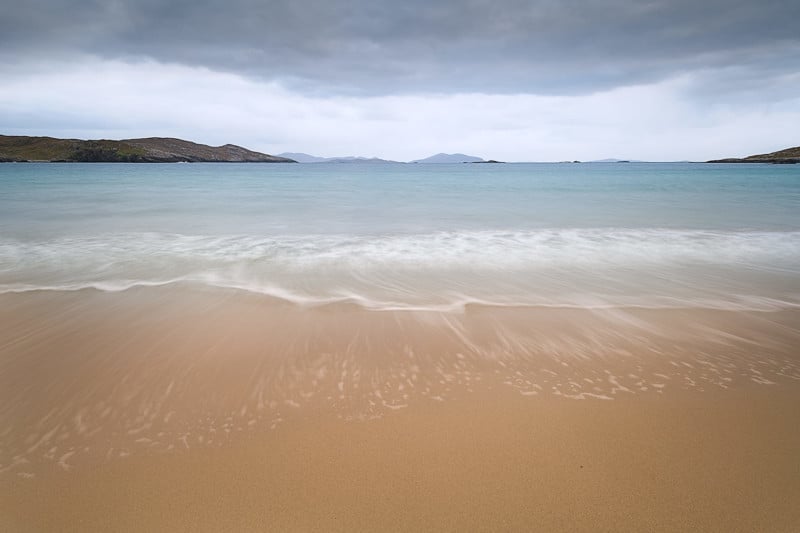
Tarbert is a port town, a docking place for the ferry from Skye but a taste of other times hangs in the air. Terraced cottages line the side of the hill. We rented a cottage for four nights and set off to dip our toes into the landscapes of Harris and Lewis. Not an hour and a half after stepping off the ferry we walked the length of Seilebost beach.
A little travel weary – but the landscape just soaked us up and soothed us in. I took some initial photographs on the beach into blue hour – just to let the camera out of the bag as the light was dull and dimming. We drove back to Tarbert in the dark. We had indeed arrived.
At dawn the following morning we sat in the sandy car park at Rosamol as the skies provided a free car wash. There were two other cars and a camper van – each seemingly daring the other to take to the beach first. The rain eased and we walked the wet sandy track to the wide beach. The hills of Harris dipped in and out of clouds. The light was a dirty grey and the photographs taken that morning were a reflection of the weather. But the hills and islands encroaching the beach were akin to an amphitheater and made an instant impression that would draw us back to this beach.
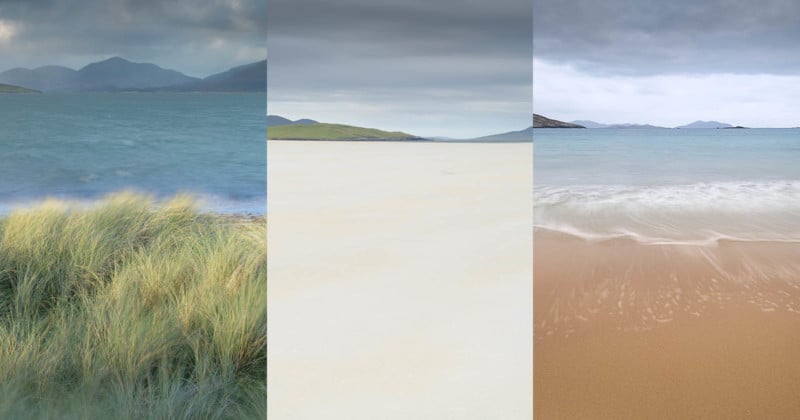
The eastern shore of Harris is pockmarked with tiny lochs that meet the sound of the Minch, the strait that divides the isles from the highlands. The western shore could not be more different – the lauded beaches that deservedly act as a magnet for landscape photographers and artists. The beaches lend themselves to the creation of dreamlike impressions that longer exposures serve best. I fully expected my wide-angled lens would live on my camera body for the trip but found that longer focal lengths better served my purposes.
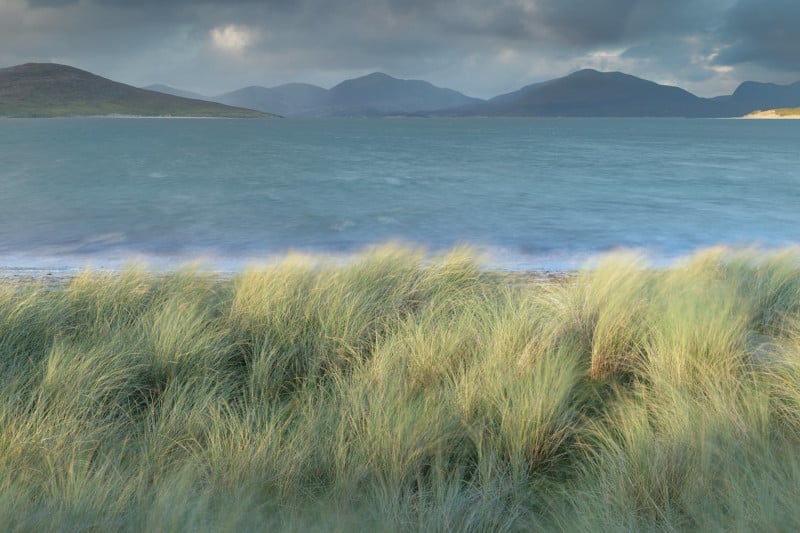
All of the beaches along the western shore deserve a dedicated visit. Horgabost beach is compact and suffers from occasional drifts of dead seaweed as was the case when an unexpected burst of evening light necessitated an impromptu visit. The beach was not an option so I hurriedly ran atop the dunes and shot to exclude it – a 6-second exposure to soften the marram grass as it merged with the Atlantic.
Horgabost beach
The following day we took the spectacular single-track road to Huisinis beach and witnessed golden eagles and a large migration of redwings on the route.
Huisinis beach
This is another compact beach good enough to shoot independently but the jewel of the area is Tragh Mheallan. The beach requires a good 45-minute walk with an incline along a well-marked cliff path.
An otter greeted me along the cliff walk. A white-tailed eagle flew overhead. The beach was enormous and empty. The marram grass held no human footprint but was indented by the tracks of deer. My composition was rushed as the light faded on an overcast afternoon. An enthralling location.
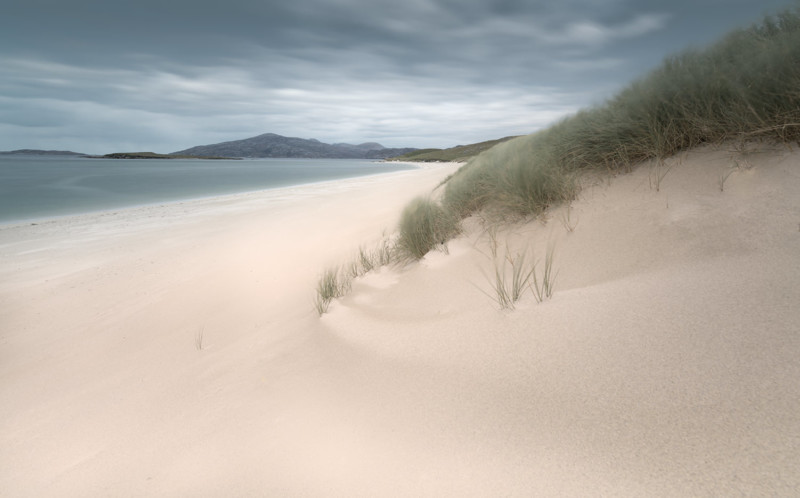
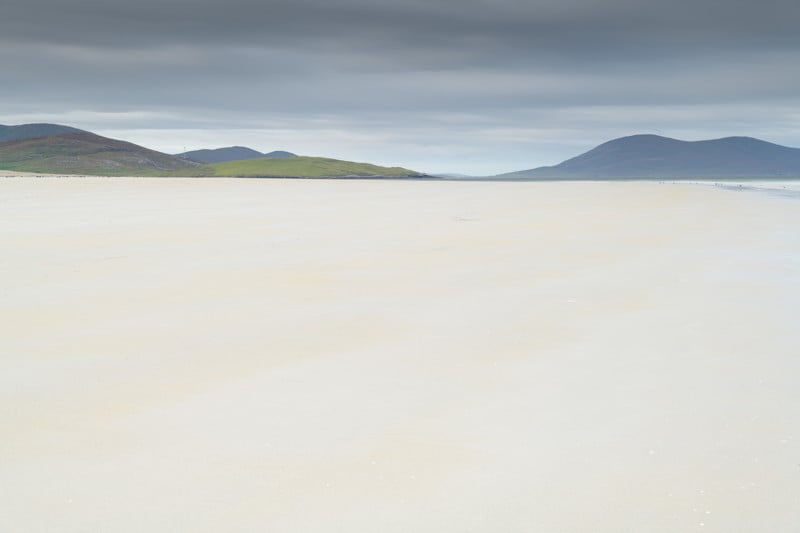
Luskentyre is the most popular beach in Harris – it is effectively a bay – Rosamol and Seilebost beaches at either side. I visited for two sunrises during our stay once on each side.
Luskentyre beach
Rosamol should be your first choice as it was mine. The light on my dawn visit was dull. The dunes and distant mountains though impressive deserved better light. A beach tends to fare better in duller light and so my preferred images were abstract in nature and the compositions drew substantially on the sands. At Seilebost, the light was a slight improvement and I played with a layered composition of rocks, sea, sand, mountains, and sky.
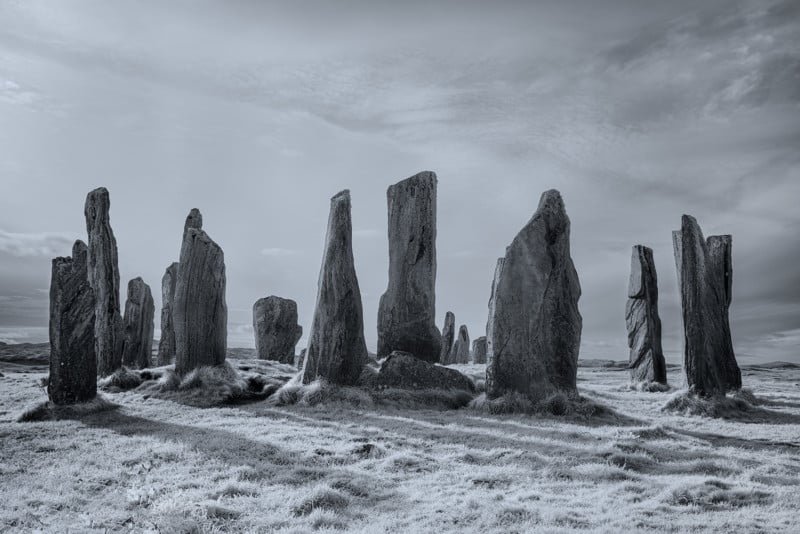
And so we had spent 3 days exploring parts of Harris and had not yet ventured into Lewis – the largest part of the island. A trip to this island would not be complete without a visit to Callanais Standing Stones and that is where our final day took us. Out of the bag came the infrared camera for a noon shot of this archaeological wonder.
Callanais Standing Stones
The afternoon was drawing in but we pressed on further from home to the Mangarsta Sea Stacks.
The Mangarsta Sea Stacks
The light was never going to be interesting but to view the scene and take an image for the sake of it was worth the effort. And so our short sojourn to the Outer Hebrides ended.
Here are two videos of my 2021 trip to Scotland showing my landscape photography outings in a vlog style:
About the author: Jimmy Mc Donnell is a landscape and wildlife photographer from Co Wicklow, Ireland with an enduring passion for capturing images that reflect the beauty of the natural world. The opinions expressed in this article are solely those of the author. You can find more of Mc Donnell’s work on his website and YouTube. This article was also published here.
A talented photo colorizer has paid a tribute to wartime animals by breathing a new and colorful life into historical photographs that depict them and their sacrifices.
Tom Marshall is a professional photo colorizer based in Leicestershire, United Kingdom. He has worked with some of the world’s leading museums, photo archives, publishers, as well as numerous private clients.
Marshall lives close to the base of the Defence Animal Training Regiment that still to this day trains military working dogs and horses. He has a personal interest in wartime stories about heroic animals that have helped people in service and those used as mascots and companions. Each year for Remembrance Sunday, the Royal Army Veterinary Association will take part in a parade through the town, making sure the animal sacrifices of wars past and present are not forgotten.
With his personal tribute to the impact these animals have made, Marshall has colorized a collection of images, some of which are over 100 years old. Marshall points out that some of the animals photographed were later officially recognized by means of the Dickin medal. This award was instituted to honor the work of animals in the Second World War and continues to this day.
The photograph above depicts an unnamed British Royal Artillery soldier with his kitten, taken around 1917. Animals were often brought into the trenches, sometimes as a mascot for the regiment. In this case, the kitten might have been picked up from a local farm or a destroyed village.
“I colorized the photos as a tribute to the animals pictured, because I believe that color adds another dimension to historic images, and helps modern eyes to connect with the subjects, more than with a black and white photo,” Marshall tells PetaPixel. “I have found that black and white images are too often sadly ignored, especially by younger generations, and by colorizing the photos, I hope that more people will stop to learn more about the subjects and what the animals went through 100 years ago and throughout the past century.”
Each photograph tells a story of the relationship and bond shared between people and animals. Although animals share unconditional love and dedication to people, this collection also reminds us that they too are victims of human war. They didn’t choose to be there, even though circumstances led to it.
The group photo is a picture postcard, dated December 1909. Marshall was commissioned to colorize the photo by descendants of William Field, third from the left.An unknown British Tommy from the ‘A’ Squadron, the North Irish Horse Regiment. It is estimated that eight million horses, mules and donkeys died during the First World War.The ship’s cat has been common feature on many trading, exploration and naval ships dating to ancient times. They were used to attack and kill rodents which would cause damage to ropes, woodwork, food, and stores, and would spread disease. These two kittens lived aboard HMS Hawkins, a heavy cruiser built by the Royal Navy during the First World War, though not completed until 1919. The kittens are pictured inside the barrel of a 7.5-inch gun. The Royal Navy banned cats and other pet animals from all ships on the ocean in 1975 on hygiene grounds, however cats are still common on many private ships.Simon was a ship’s cat who served on the Royal Navy sloop-of-war HMS Amethyst. He was adept at catching and killing rats on the lower decks. Simon rapidly gained a reputation for cheekiness, leaving presents of dead rats in sailors’ beds, and sleeping in the captain’s cap. In 1949, during the Yangtze Incident, he received the PDSA’s Dickin Medal after surviving injuries from a cannon shell that tore through the captain’s cabin seriously wounding Simon and killing the captain. The badly wounded cat crawled onto deck, and was rushed to the medical bay, where the ship’s surviving medical staff cleaned his burns, and removed four pieces of shrapnel, but he was not expected to last the night. He managed to survive, however, and after a period of recovery, returned to his former duties catching rats. He is still the only cat to have been awarded the Dickin Medal as of 2021.A sergeant of the Royal Army Veterinary Corps bandages the wounded ear of ‘Jasper’, a mine-detecting dog at Bayeux in Normandy, 5th July 1944.Rip was a mixed breed terrier awarded the Dickin Medal for bravery in 1945. He was found as a stray in Poplar, London, in 1940 by an Air Raid Warden Mr. E King, and became the service’s first search and rescue dog. He is credited with saving the lives of over 100 people. Rip was not trained for search and rescue work, but took to it instinctively and his success has been held partially responsible for prompting the authorities to train search and rescue dogs towards the end of the Second World War.Venus the bulldog mascot of the destroyer HMS Vansittart, 1941.HMS Stork’s mascot, on board ship, Liverpool, 18th May 1941.Aircrew was a young cat adopted by the Royal Australian Air Force Flying Training School, Cressy, Victoria, Australia.Horses pull makeshift sleds through the mud of the First World War.A Royal Canadian Army Veterinary Corps Captain and horse c.1916.A horse and soldier transporting boots. The path is inches deep in wet mud discernible by the deep imprint round the soldier’s boot and the fact that the horse’s hooves are no longer visible. Rather than cloth puttees though he is wearing long lace-up boots. The horse is absolutely laden with rubber trench waders. Horses, due to their reliability and ability to travel over most terrains were crucial to transportation during the First World War.A B-type bus converted into a pigeon loft enabling messages to be sent from the front line back to headquarters. Over 100,000 carrier pigeons were used as messengers throughout WW1 and records show they delivered 95% of their messages correctly.
You can find more of Marshall’s work on his website and Instagram page.
Image credits: All images courtesy of Tom Marshall and used with permission.
Datacolor is famous for helping creatives bring out the best colors in their work. And right now, they’re giving you the opportunity to save up to $80 on the Datacolor Spyder and ColorReader range. But don’t wait around! This special is only on offer until December 3rd or while stocks last.
Full disclosure: This sponsored article was brought to you by Datacolor.
To the professional creatives out there, here’s a deal you do not want to miss! Datacolor is taking $80 off the SpyderX Elite monitor calibration tool – their fastest and most accurate Spyder ever. This handy device gives photographers, designers, and filmmakers total control of the color workflow with unlimited calibration setting choices, and advanced tools for display mapping and analysis. Normally valued at $279.99, this week Datacolor is selling the SpyderX Elite for just $199.99.
If you’re serious about your photography, the SpyderX Pro is also on special this week. Aimed at photographers and designers looking for a super fast and accurate calibration tool that doesn’t require a science degree to figure out, the SpyderX Pro is selling for $129.99 right now. That’s $40 off the normal price.
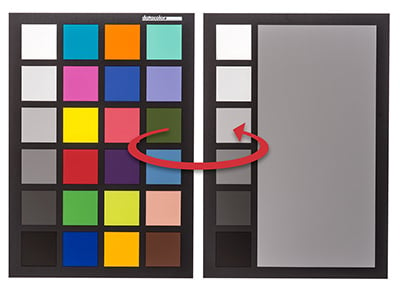
If design or product photography is your thing, you might have been eyeing the ColorReader EZ as the next new tool in your kit. Guess what… It’s $10 off at the moment! And while you’re at it, pick up the Spyder Checkr 24 color card and software combo for another $10 saving.
Don’t wait around! Add some extra jingle to your pocket this holiday season and save big on Datacolor Spyder and Datacolor ColorReader products today! Check these four special deals out below or head over to the Datacolor Black Friday sale now.
For Expert and professional photographers and motion image makers looking for the most comprehensive monitor calibration tool for maximum control of their color workflow.
The Fastest Spyder Ever: Calibrating your monitor now takes just a minute or two.
The Most Accurate Spyder Ever: Groundbreaking lens-based color engine provides a higher level of color accuracy for multiple monitors and projectors.
See The Difference Instantly: SpyderProof functionality provides full-screen before-and-after evaluation of your images.
Color-coordinate your photo shoot seamlessly. Scan a color to instantly find its Savage Universal background color match, paint color match, plus precise color values for easy conversion to Pantone.
Match to the closest Savage Universal Seamless Background paper color.
Get the 3 closest paint matches across all major paint brands.
“Try on” paint color with Samplize peel-&-stick paint samples.
Get CIE Lab, RGB and Hex color values for your measured color.