A team of professional photographers had the rare opportunity to record a timelapse of the Suurhoff Bridge as it sailed through the Rotterdam city center towards its final installation location.
Bas Stoffelsen — owner of The Timewriters — is a professional timelapse photographer from the Netherlands who told PetaPixel that he was asked by the Dutch Ministry of Infrastructure to create a timelapse documenting Suurhoff Bridge’s (“Suurhoffbrug”) journey as it took a slow river cruise through the heart of Rotterdam.
The bridge, which is a 656 long tied-arch bridge, headed for its destination near the Dutch city’s busy port area, where, after arriving almost one week later, it was installed alongside an already existing bridge that currently carries traffic to and from the Maasvlakte port area.
To capture the journey, Stoffelsen and his team used self-made “timeboxes,” which are waterproof housings outfitted in this case with Canon EOS Rebel T7 — also known as the EOS 2000D — and a computer with a 4G connection to control the timelapse. For the lens, a wide-angle Sigma 10mm f/2.8 was used to allow them to capture as much of the scene as possible.
The bridge has to turn on a few occasions, so the team used two cameras to ensure that the forward movement was always visible. Overall, each camera shot around 40,000 photos at an interval of three seconds throughout the journey and installation, which is approximately 26 minutes of footage at 25 frames per second.
Because the journey took multiple days and the lighting constantly changed dramatically as a result, Stoffelsen says the team couldn’t shoot in manual, and a lot of post-production work was specifically focused on getting rid of the visible “flicker” that can occur during complex timelapses. The two needed to make sure the film was as smooth as the ride itself.
To solve the problem of powering the timeboxes — as each uses approximately 15 watts — they relied on a complete battery trailer, which was hoisted aboard the bridge to ensure that there isn’t a moment when the equipment runs out of power.
Most long-term timelapse boxes either rely on wired power (which would be complicated here without the battery trailer) or solar power. Stoffelsen says that any alternative options the team had considered wouldn’t be good enough, especially because the journey was delayed for a week due to bad weather, and the timeboxes were already installed by that time. Furthermore, because the equipment was already installed, the cameras were out of reach because once they went up, no one was allowed to access their location.
The team made sure that everything was set up and checked ahead of the departure, and hoped that nothing went wrong as is often the case with long-term timelapses, but especially so with this mobile situation. Stoffelsen noting that even something as unfortunate as bird waste or anything else that might cover the camera would dramatically affect the viability of the final footage.
Luckily, the footage came out just as they hoped, especially because a project as grand as this does not happen particularly often, Stoffelsen says.
“First off all, a bridge under a bridge… and then, there is the view. Height is key in this story. The higher you can hang your cameras the better the view, and even for the port of Rotterdam, these kinds of transports through the centre-area are rare.”
The Timewriters have had a past timelapse project of a boat sailing through the Dutch waterways featured on PetaPixel earlier in 2021, but for several other timelapse videos filmed by the company, make sure to check out The Timewriters’ website or YouTube channel.
Every Sunday, we bring together a collection of easy-reading articles from analytical to how-to to photo-features in no particular order that did not make our regular daily coverage. Enjoy!
— O-Pee-Chee Hockey Card Story (@hockeymedia) May 28, 2021
A pristine Wayne Gretzky (age 18 in the photo) trading card from his rookie NHL season of 1979-80 sold for a whopping $3.75 million in a private transaction via Heritage Auctions this past week.
Notable:
Steve Babineau, then only 3-4 years on the job, was the official Bruins team photographer who took the photo. He is now 68 and with the Bruins for 45 years.
The camera used was a Topcon Super DM with an 80-200mm lens.
Babineau sold the transparency from his freelance assignment to Topps in New York in the spring or summer of ’79 for the going rate of $17.
“A roll of film in those days went for $5,” Babineau recalled to The Boston Globe. “Then it was maybe another $6 to get the roll developed. OK, so now you’re at $11 for a payout of $17. And don’t forget, you were putting out $11 with no guarantee that you’d sell a single thing. Crazy!”
Babineau believes he still has the transparency tucked away in some box, and we are sure he will be spending Memorial Day Weekend going through all of them in his basement.
On the anniversary of the murder of George Floyd by a Minneapolis police officer, people gathered around the country to advocate and pay their respects.
The Photography of Hilla & Bernd Becher, the Importance of Memory
If you have a formal education in photography, there’s a good chance you studied the work of Hilla Becher. Together with her late husband Bernd, Hilla founded what’s known as the “Becher School” in photography. The couple’s black-and-white industrial photos of Germany — called “typologies” — influenced a generation of photographers, including the renowned German photographer Andreas Gursky.
Burj Khalifa, Dubai, the tallest building in the world since its topping out in 2009
Belgian and Portuguese photographer Xavier Portela is known for his visual onslaught of signs and neon lights series: Glow, an ongoing personal project for which he travels the world to capture various cities at night, inviting us to dive into the atmosphere of those locations.
He was visiting Sharjah for a photo festival and decided to pay Dubai a short visit to add to his Glow series.
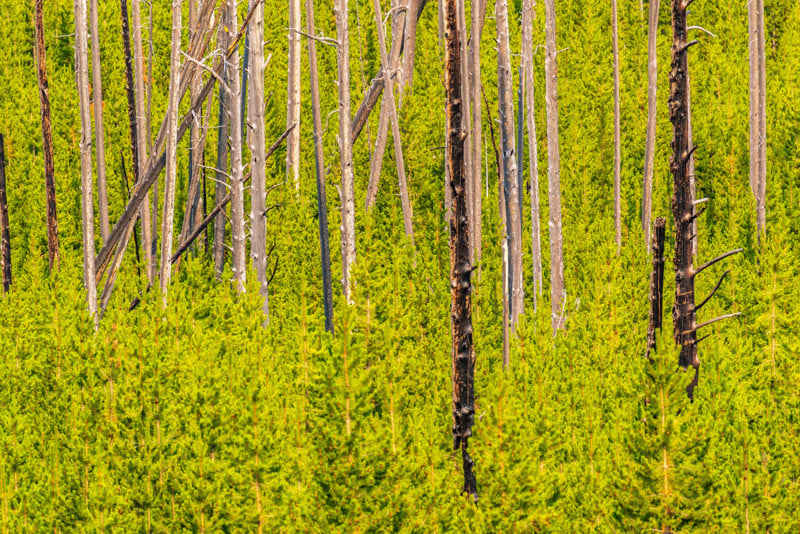
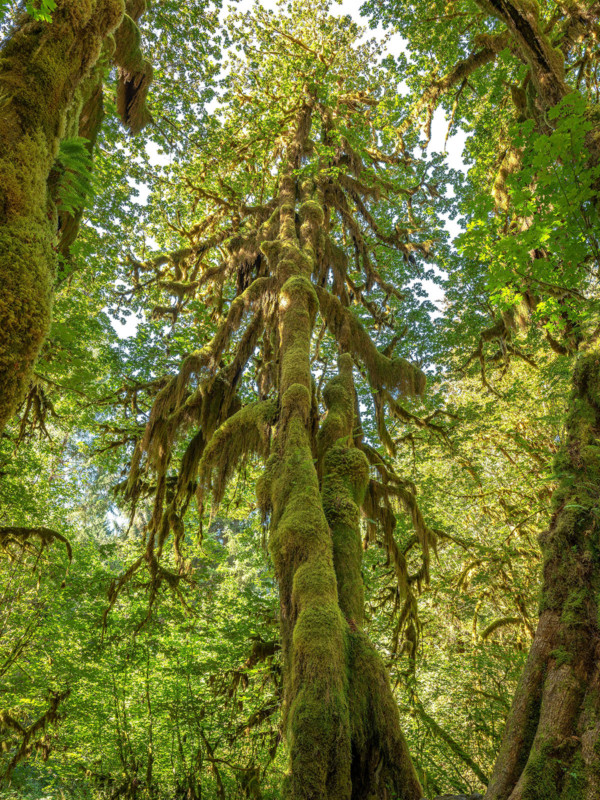
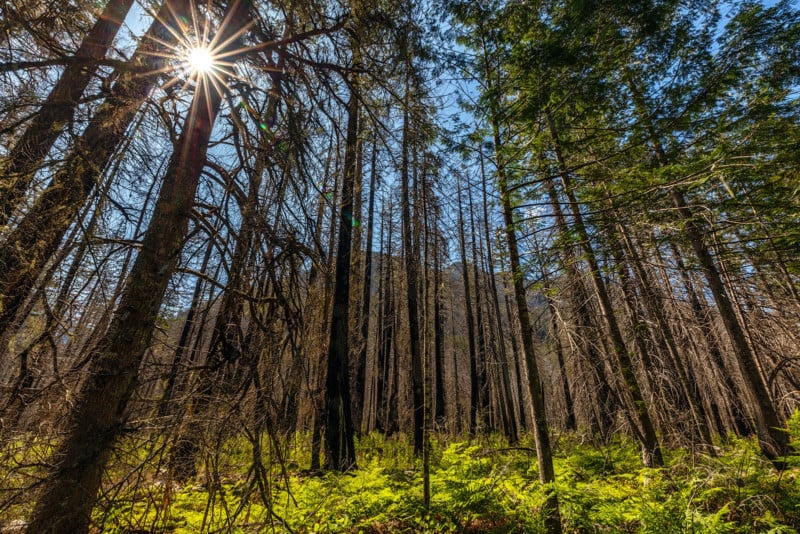
“I used not to be interested in photographing forests at all,” Rebecca Latson tells PetaPixel. “But on that one day, I peered into the shadowy, secretive interior of the forest during my Glacier National Park visit.
I really saw all those shades of green and brown, and I realized, then, I was missing a key component to fleshing out my national park stories. For me, the key to getting a great forest shot is to use a tripod and a slow shutter speed to capture that hidden forest glow.”
“Aarons, who died on May 30, 2006, is better known for donning a cravat and linen jacket than military fatigues,” writes Town & Country magazine. “However, he actually got his start as a combat photographer in World War II, covering some of the war’s deadliest battles, spanning North Africa, the Middle East, and Europe.”
Notable: Aarons kept his poor immigrant Yiddish-speaking family on the Lower East Side of Manhattan a secret. If Aarons’ true origins had been known, his career then would have been unlikely to succeed within the restricted world of celebrity and WASP privilege his photography glamorized.
In 2017, T: The New York Times Style Magazine asked Adam Ferguson to cover the T Greats party at the Met Breuer in New York City. Ferguson, a war photographer, was not a perfect fit for photographing the cocktail and dinner party, but he did create a great image of Nicki Minaj.
How Much This Photographer Made on YouTube in 2020?
Zach Sutton, an editorial and portrait photographer in Los Angeles, CA, feels that you can do a whole lot with a white background despite its simple look. Check out his five different ways to use a white backdrop to get very different looks.
Since 2013, creative duo Julia Classen and Magdalena Lepka of Studio Likeness in Berlin have been busy developing their very own visual language, working together on unique concepts for still life photos and videos.
“In the past year, we spent more time at home and saw less of our friends than ever before,” the duo tells Wallpaper. “We missed them a lot, and we knew that many people felt the same way about the lack of social encounters. So, we went looking for new friends in our own homes and discovered friendly faces all around.”
— Reuters Pictures (@reuterspictures) May 27, 2021
Quiz of the Week:
Which was the first camera with through-the-lens metering? Was it:
1.) Nikon
2.) Topcon
3.) Pentax
Answer: It was the Topcon RE Super, launched in 1963 at Photokina, the company’s most innovative camera and one of its most rugged and versatile. It was the first SLR with a TTL (through-the-lens) exposure meter. Pentax would follow the next year with the Spotmatic, and Nikon only in 1965 with the Nikkormat FT and with the Photomic T prism for the Nikon F.
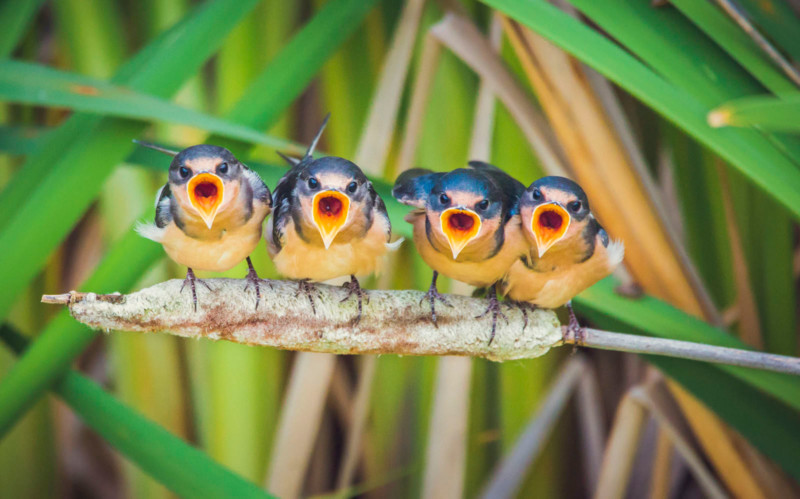
One of the things that I like about it is the way that it leaves things a bit open to interpretation. Are the birds angry? Are they singing a song? Or, as was actually the case, are they squawking at their parents and opening up their beaks for a freshly caught meal? This photo is one that I likely get the most comments and questions about.
I found these four young barn swallows one afternoon in July 2019 when I ventured out into Lois Hole Centennial Provincial Park near St. Albert, Canada. Walking across a boardwalk over the wetlands, I spotted these four birds lined up perfectly on a cattail. Their bright blue color really popped against the green backdrop of the reeds behind them.
After watching them for a few minutes, I noticed that they would begin chirping frantically for the few seconds before their parent would arrive with a meal. Each of them seemed to be jockeying for position and attention with each delivery.
The early warning system of their squawking only provided about a one or two-second lead time before the parent would drop the food in one lucky child’s mouth and then disappear in search of another meal.
I knew that I would need a fast shutter speed to try to capture the action. Shooting with a Sigma 150-600mm F5-6.3 DG OS HSM Contemporary zoomed in to the full 600mm, I was forced to bump up my ISO to 3,200 to get a fast enough shutter speed at 1/1,250s, f/6.3. I locked my focus onto the birds, set the Canon EOS 6D Mark II to continuous shooting mode, and waited for the next arrival. As soon as the birds started chirping, I fired away, capturing the magic that happened in those few seconds.
I always smile when I look at this shot and think about those little birds and, perhaps even more so, empathize with the parents who were working so tirelessly to keep their little ones fed and happy as we all do.
Tim Osborneis a photographer based out of St. Albert, Alberta, Canada. With a primary focus on wildlife, Tim has a passion for capturing the personality and character of his subjects in their natural environments. While his photography has taken him as far as Africa, his primary focus remains on exploring the natural world right here in his own backyard. Tim is a strong supporter of ethical wildlife photography.
Quote of the Week (or a previous week): Donna Ferrato
Photography is invasive, and it can hurt people a lot.* — Donna Ferrato
*From her Master Class at 2min 57 sec.
To see an archive of past issues of Great Reads in Photography, click here.
We welcome comments as well as suggestions. As we cannot possibly cover each and every source, if you see something interesting in your reading or local newspaper anywhere in the world, kindly forward the link to us here. ALL messages will be personally acknowledged.
About the author: Phil Mistry is a photographer and teacher based in Atlanta, GA. He started one of the first digital camera classes in New York City at The International Center of Photography in the 90s. He was the director and teacher for Sony/Popular Photography magazine’s Digital Days Workshops. You can reach him via email here.
Image credits: All photographs as credited and used with permission from the photographers or agencies.
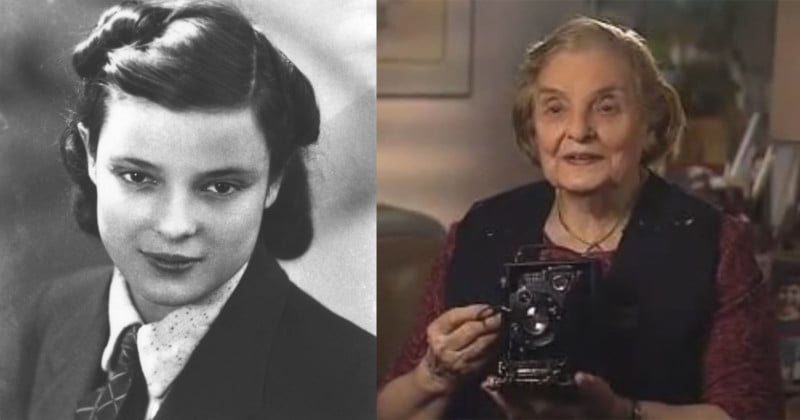
Faye Schulman was a Jewish partisan photographer who courageously fought against Nazis with both a gun and a camera. She was the only photographer to document resistance efforts in Eastern Europe during World War II.
Faigel “Faye” Lazebnik Schulman was born on November 28th, 1919, in the Eastern Poland city of Lenin (a town that’s in modern-day Western Belarus).
Faye’s brother Moishe was a photographer, and he taught her the skills of shooting photos, developing film, and making prints.
When the Nazis invaded the area in 1941, 1,850 of the Jews in the town were rounded up in a ghetto except for six “useful Jews” that included a tailor, a carpenter, and a photographer. That photographer was Schulman.
The following year, on August 14th, 1942, the Nazis killed all 1,850 Jews living in the ghetto, including Schulman’s family. Schulman was one of just 26 people spared that day due to her skills as a photographer, J. reports.
“After the killing, I continued to work as a photographer for them and I was hoping maybe there will be somehow a way how I could escape and I could join the Partisans,” Schulman says. “I could have escaped when the people were alive. But if I would have escaped, the whole family would be killed, another 50 people.”
Schulman was working as a photographer for the Nazis when she was given film of the massacre to develop. While working with the photos, Schulman was horrified to find photos of her own murdered family in the mass graves, and this steeled her resolve to join the partisans.
Schulman spoke about this memory in this interview she gave some years ago:
“[T]hey brought me again the films to develop and […] in one of the films I noticed this is the trenches where my family is,” she says. “[T]his picture is the exact […] trench where my family is shot — my father, my mother, my 2 sisters, my sister’s 2 children and the husband, and my 2 younger brothers and they’re all shot all in those 3 trenches and they covered up […]”
“I knew what’s going on and can you imagine how painful it was when I helped. […] [W]hen I developed the film, I made the positives and I made a few copies for myself and that’s how I saved the real pictures where my family’s killed in our town.”
When partisans raided the area, Schulman fled into the forest and joined a partisan group called the Molotava Brigade. She served in this group as a nurse for a couple of years.
When the group raided Lenin again, Schulman managed to recover her old camera equipment, and this is when she began documenting the resistance effort she was involved in.
“During the next two years, she took over a hundred photographs, developing the medium format negatives under blankets and making “sun prints” during the day,” the Jewish Partisan Education Foundation writes. “On missions Faye buried the camera and tripod to keep it safe.
“Her photos show a rare side of partisan activity — one is a funeral scene where two Jewish partisans are being buried alongside Russian partisans, despite the intense antisemitism in the group. In another image, Schulman and three young Jewish men smile joyously after an unexpected reunion in the forest — each believing that the other had been killed.”
Schulman showed and talked about the camera she used in this interview she gave:
“Here is my camera, the original camera that I have since 1939,” she states. “This camera I took pictures when the Russians occupied. I took pictures when the Nazis occupied and I took pictures in the Partisans. This camera was buried in the ground many times when I was in the Partisans and I were attacked and I was on assignment and many time I took it the camera out and it still works.
“And the same camera, all my pictures that I took was all with this particular camera. I would never like to part as long as I live with this camera. So many memories and so many stories and so many things happen and this camera has seen everything.”
Schulman was one of the only known Jewish partisan photographers who documented the valiant struggle.
“I want people to know that there was resistance,” she stated. “Jews did not go like sheep to the slaughter. I was a photographer. I have pictures. I have proof.”
After the war, in 1948, Schulman immigrated to Toronto, Canada, where she would live the rest of her life. Schulman passed away surrounded by family on April 24th in Toronto at the age of 101.
Image credits: Header portrait via the Jewish Partisan Education Foundation
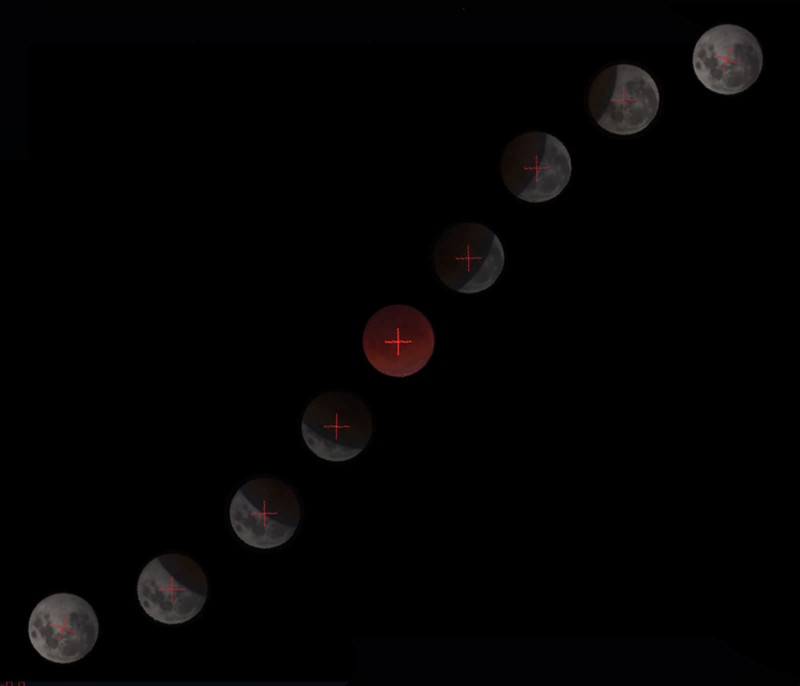
G’day from Australia, my name is Jason De Freitas (@jase.film on Instagram), and I’m a photographer mostly known for my analog astrophotography. In this article, I’ll describe the process and decisions I went through to take this lunar eclipse multi-exposure sequence on medium format film.
The Aim
There are two common but very pleasing eclipse sequence shots that I’ve seen a lot. The first kind of sequence is the process where you take several different photos of the moon during different phases of the eclipse with a long focal length to combine them later in Photoshop. Usually you will wait for long periods of time to get big differences in partial eclipse magnitudes. Combining them with a composite in post allows you to bring each moon image closer together for a more pleasing composition with the moon appearing much larger. I had personally not seen this done in-camera before.
The second kind of sequence however is one that I have seen done in-camera several times. The method is to use a very wide lens and take multiple exposures when the moon has moved just past one diameter length. This creates a long sequence of very small partial phase changes with the moon’s movements as they actually occur in the field of view. In this kind of sequence, the moon is very small in the frame and it can be difficult to see the eclipse phases well however it gives you the chance to place the event in context with a landscape.
For my location on the east coast of NSW, Australia, the partial eclipse began too high in the sky to compose it with a foreground landscape. I decided I would therefore attempt a composite sequence instead and for a challenge, I would see if I could do it in-camera. I shoot with film mainly because I love the process but it also encourages me to try to get results straight out of camera so that I can view them as slides on a light table or project them.
I didn’t have the luxury of deciding the composition in post, so I used Stellarium (free planetarium software) to plan out the shot. It allows you to input your sensor size (or film size in this case) as well as your focal length to preview what your field of view will look like. I decided to shoot this photo with a medium format camera since the size of the moon in the frame is relatively small and grain could limit the size of prints. Medium format slides are also just incredibly satisfying to look at on a light table.
I used screenshots to generate this composite plan in Photoshop based on a 600mm lens that I have.
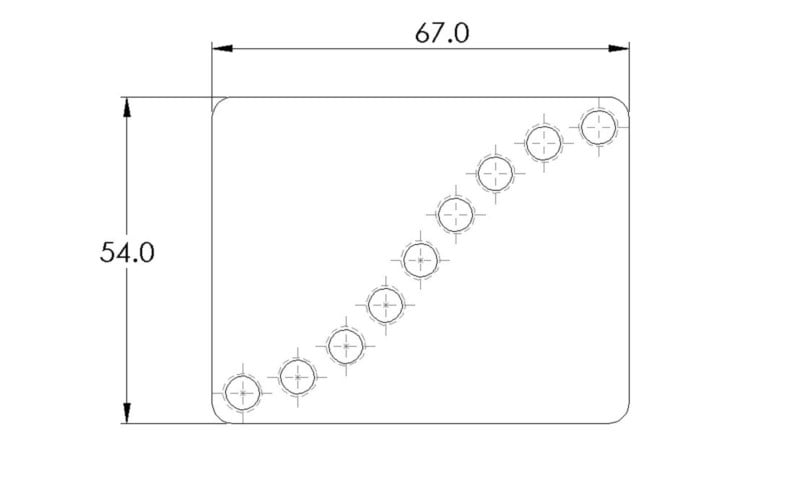
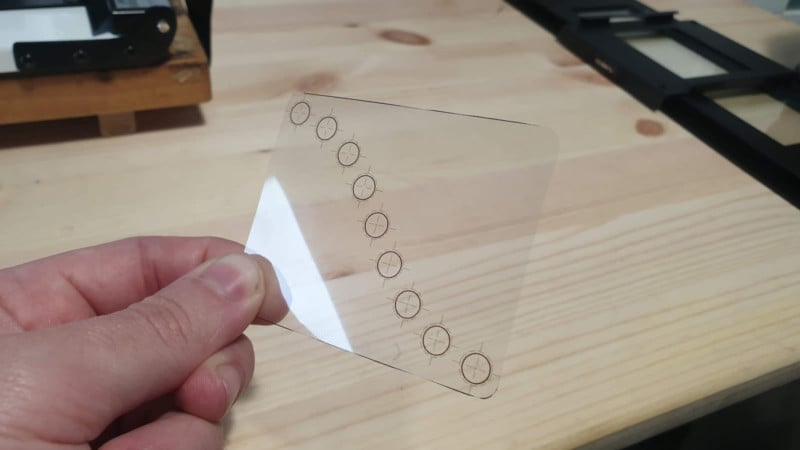
Creating a Custom Viewfinder Template
I used a Pentax 67II for this shot and if it had grid lines on the focus screen I could have possibly estimated each shot position. Instead, I came up with a simple way to make custom frame lines using inkjet transparency sheets. Using my Photoshop plan as reference, I sketched up a template using SolidWorks — it’s engineering CAD software, but I only used it because I work with it for my day job. Adobe Illustrator probably would make more sense to use instead! The end result was this template, scaled accurately to the size of the ground glass and predicted moon diameter in the field of view.
The next step was to print it out on paper to make sure it fit correctly on the focusing screen. Finally, after that, I printed out the template on inkjet transparency film with a regular home printer and cut it to size.
Exposure
Exposure settings change during different stages of a lunar eclipse but fortunately, it’s quite easy to plan for. Mreclipse.com has a very useful table to work that out beforehand. However, during totality (the blood moon part) the exposure can vary a few stops and isn’t predictable so you have to meter. I decided to bring a DSLR with me to use as a meter since slide film needs precise exposure, unlike negative film.
Execution
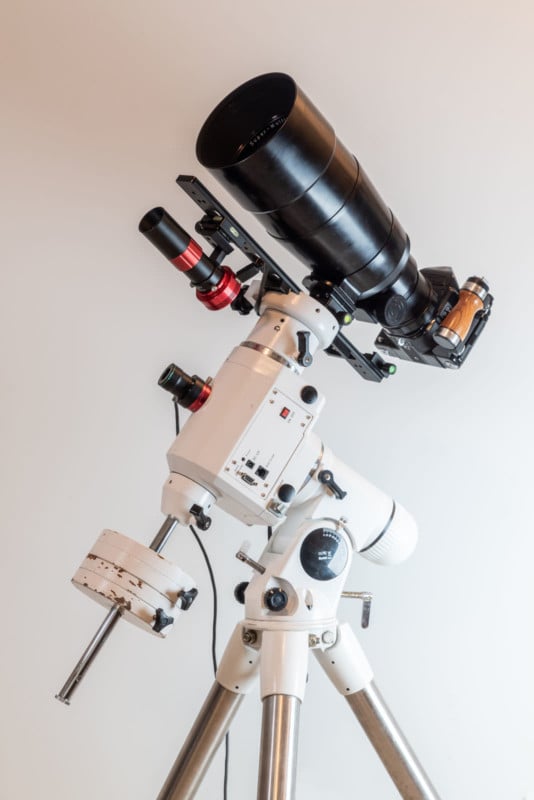
I had everything planned out, the times I would shoot each phase I wanted and the exposures I would need. I mounted my Pentax 67ii with the Takumar 600mm f/4 on a SkyWatcher NEQ6 equatorial mount. For short moon exposures at this focal length, you can get away without an equatorial mount especially with higher ISOs. However, totality can require exposures of a few seconds at the 100-speed film I was using so I wanted to make sure my shot was as sharp as possible.
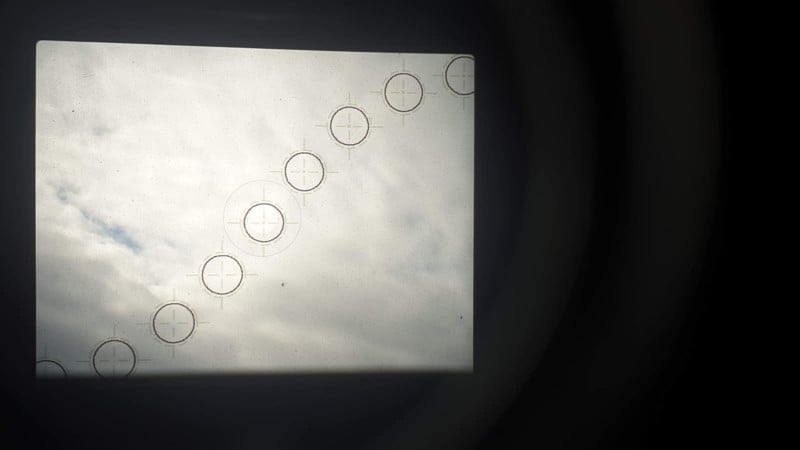
I started shooting according to my plan, the template worked a treat. The moon appeared slightly bigger than my template circles so I could easily see them align the moon very precisely. Three shots in and everything was going great until I cocked the shutter. I was holding the multi-exposure lever as I needed to however for whatever reason it didn’t engage and my frame advanced! That is not what you want during a 9-shot multiple exposure. Fortunately, it was still pretty early on in the eclipse so I had to scramble a new plan in my head and start again on the next frame.
Instead of a sequence going from full moon to full moon, I decided to go for a sequence from partial eclipses before and after totality. This time all 9 multiple exposures worked successfully and I had my shot!
Result
As always with film, you’re forced to accept some delayed gratification — or mild stress about whether your shot worked or not. The next day I developed the film in E6 chemistry. I use a sous vide machine to regulate the temperature and it works a treat. I was thrilled that everything went perfectly to plan; well the new plan but I think I like it better than the initial one.
The next step was to digitize the frame for sharing online and printing. I use a DSLR with a 1:1 macro lens to stitch several images together into one very high-resolution file. Some of you reading might think that’s ironic to go through all that just to scan it with a digital camera and while that’s not lost on me the final step to me is to mount the slide in a projector for viewing. The end result is a hybrid between a full analog process and a digital sharing age.
I’m absolutely thrilled with the shot I achieved, the satisfaction of achieving it all in-camera is an obsession that I continue to chase with more complex shots.
Thank you for reading! If you enjoyed this photo I have prints available on my website and please check out more of my analog astrophotography on my Instagram, @jase.film.
About the author: Jason De Freitas is a fine art photographer creating unique and experimental work through analog mediums. The opinions expressed in this article are solely those of the author. Located on the South Coast of NSW, Australia, Jason is recognized for his analog astrophotography, Aerochrome infrared landscapes, and stereoscopic star trails. You can find mor eof De Freitas’ work on his website and Instagram.
Following a rumor that the iPhone 13 would possibly feature sensor stabilization in some capacity on all of its models, a new report alleges that looks more and more likely as it appears Apple will be purchasing the necessary parts for the feature in large quantities in the next two months.
Apple is expected to increase orders for the voice coil motors (VCM) that are used as the basis for sensor-shift image stabilization in handheld devices in late June into early July, even outpacing the number of orders that were placed by Android manufacturers for the second half of 2021 according to a report on DigiTimes.
As noted by the report, Japan’s Mitsumi and Alps are now main suppliers of VCMs for new iPhone camera modules, and Mitsumi in particular has placed increased contract production orders to Taiwan makers including Audix and Chinese peers such as Zhonglan Electronic Technology, JCT Electronics, and GYZ Electronic Technology. Alps apparently handles automated production on its own.
Those parts makers to this point have mainly delivered shipments of the motors to Android handset manufacturers and are now expecting to dramatically increase delivery of the same parts to Apple. According to DigiTimes sources, VCM makers have been told to raise capacity for production of the parts by 30 to 40-percent to meet “strong demand for iPhones.”
At present, Apple only needs to order enough VCMs to operate a single sensor in just one of its smartphones: the iPhone 12 Pro Max. If the company were to plan to add the stabilization feature to more cameras on more phones, the number of parts it would need to do so would also need to grow dramatically. If true, this level of increase would indicate that Apple at the very least plans to add the feature to more cameras on its flagship line, if not across the board.
DigiTimes sources believe that since “demand for VCMs to support the function will grow three to four folds after all new iPhones incorporate the capability” that all of the iPhone 13 models will adopt the sensor-shift stabilization functionality in some way.
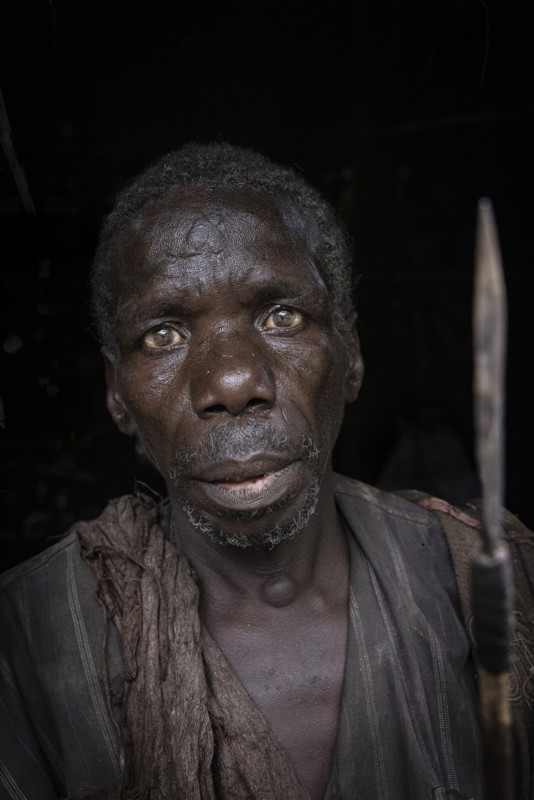
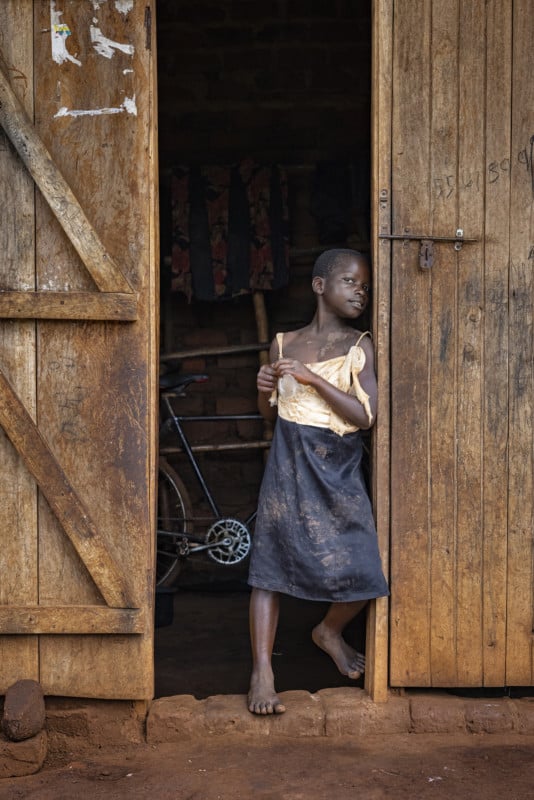
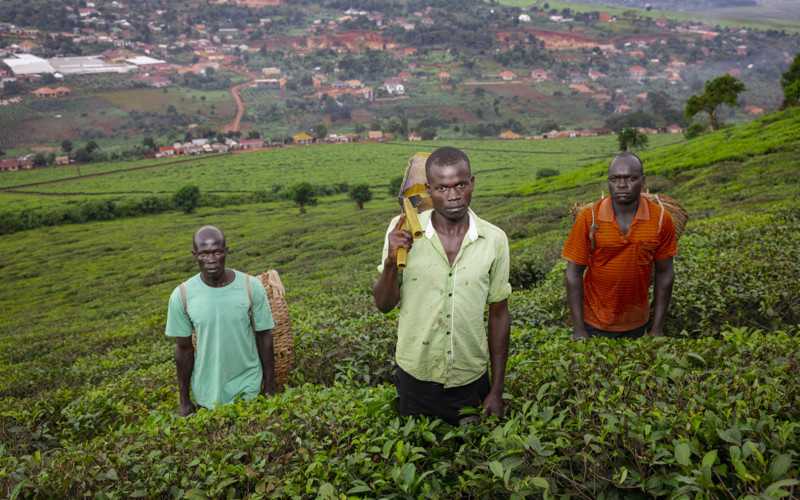
When difficulties due to local unrest as well as COVID-19 complications prevented my wife and me from being able to visit the Congo and photograph the local gorilla population, an unforeseen opportunity presented itself to go to Uganda instead, and I jumped at the chance.
In 2020, I traveled to Uganda to do something I had always wanted to do, visit the mountain gorillas of Bwindi, Uganda. My wife and I have always had a passion for animal welfare, an interest in biodiversity, and a pure love of all animals. So since we met and started earning any form of salary/wages, we began traveling to various places where we could spend time with wild animals, and it was on safari, up close and personal with all types of incredible creatures, where I really started to become interested in photography, and my love of capturing a subject and/or a moment was recognized.
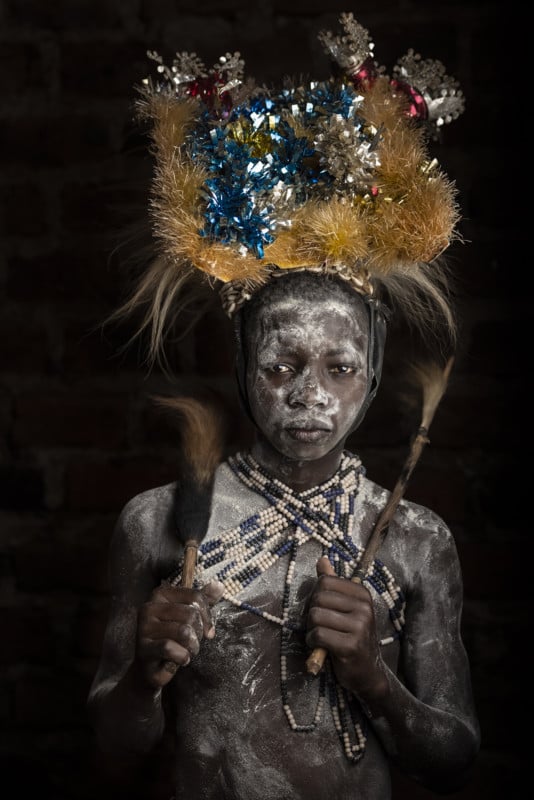
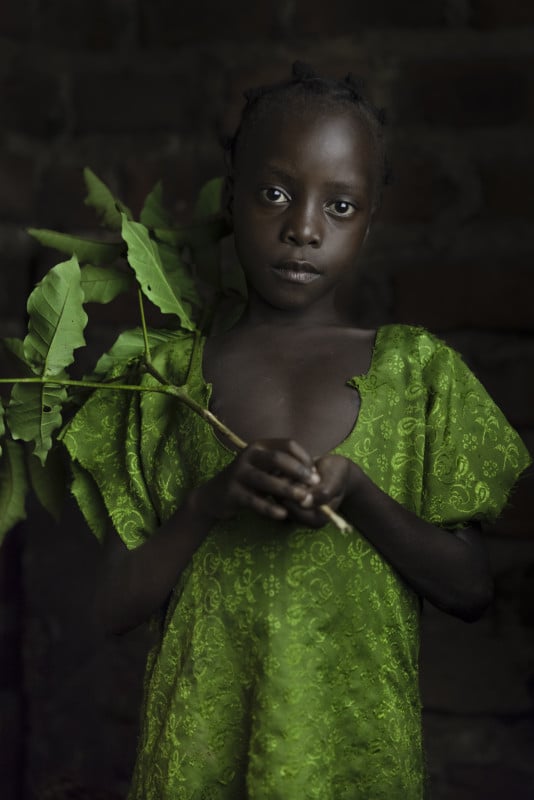
While planning to go, I decided to add on an individual photography expedition to the rural heartlands around Bwindi and Jinja. My aim was to experience firsthand what life was like in some of the poorest areas of Africa, where people had nothing other than the turf beneath their feet. Trying to avoid the cliches of African poverty, what transpired was an effort to relate observers with the faces of the local peasants (this word is commonly used to describe poor levels of wealth in Africa) and try and give an insight into not just suffering, but also their simple happiness, warmth, and expectancy of “life.”
My trip was really split into three parts: firstly, my time with the gorillas, second within local villages in the Bwindi area, and thirdly I would head to Jinja, which is located on Lake Victoria and widely considered as the “Source of the Nile.”
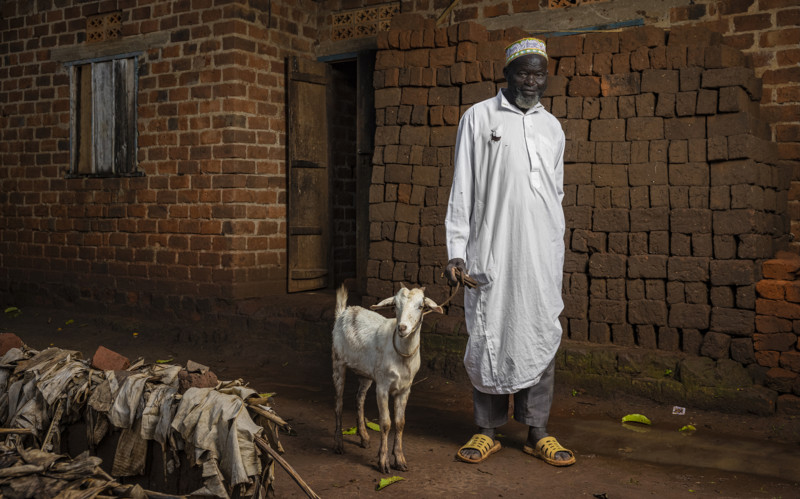
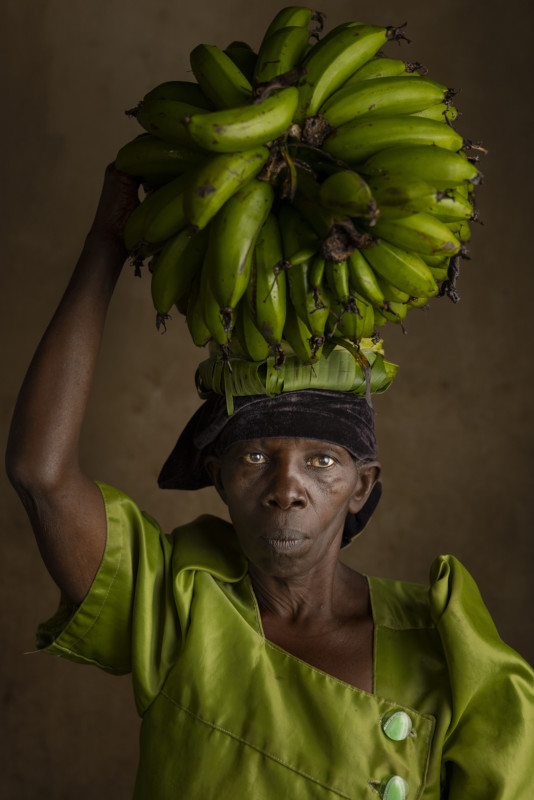
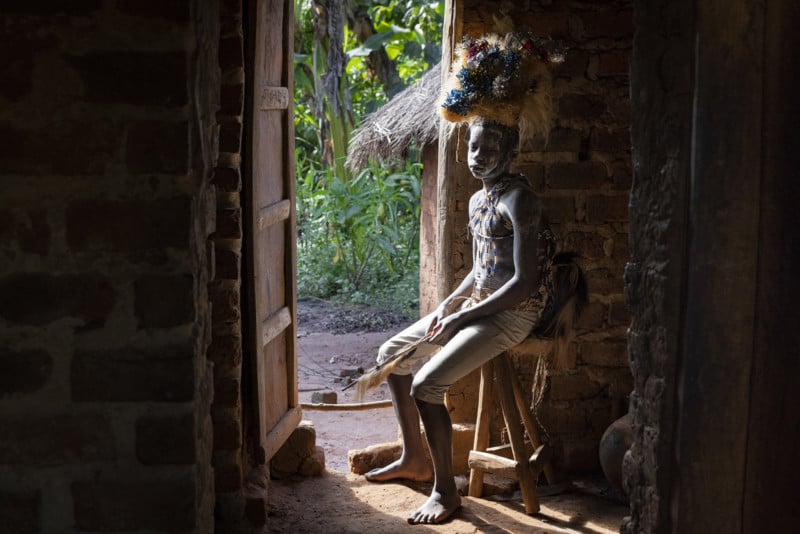
Second to the main goal of spending time with gorillas was to experience other parts of the country, and particularly the people within it. After spending a few days trekking with the gorillas and taking plenty of photos — see here for that gallery – I spent extended time in Bwindi village (adjacent to the National Park) to explore some of the local activity and the people within it. In a place that relies heavily on tourism, it was easy to get wrapped up in some of the less authentic practices, and so I searched for life a bit farther away from the gorillas and looked for areas where I could not only explore the people but some interesting photography opportunities.
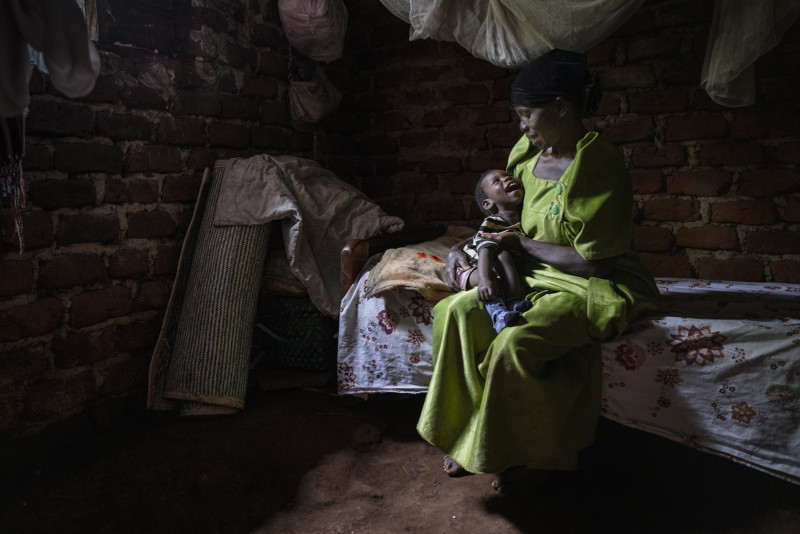
After a bit of digging and persuasion through my guide and various security personnel, I managed to gain access to coffee plantations, foundational projects, local schools, hospitals, and people’s houses. Of course, being the only Mzungu (white man) within hundreds of miles, I was aware that my time, certainly when it came to photography, was limited before the authenticity of the situations and environments I found myself in were degraded and would consequently lead to me not making many interesting photos. So with time against me (I wish I had planned more strategically) and a lack of lighting equipment (I left this with the tour company at my next destination in Jinja), I relied heavily on street portraits and environmental light towards dusk and the least amount of wide-eyed onlookers as possible.
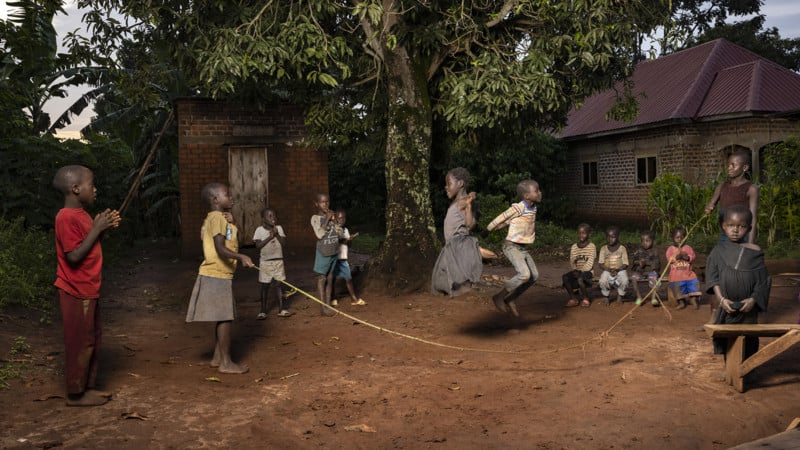
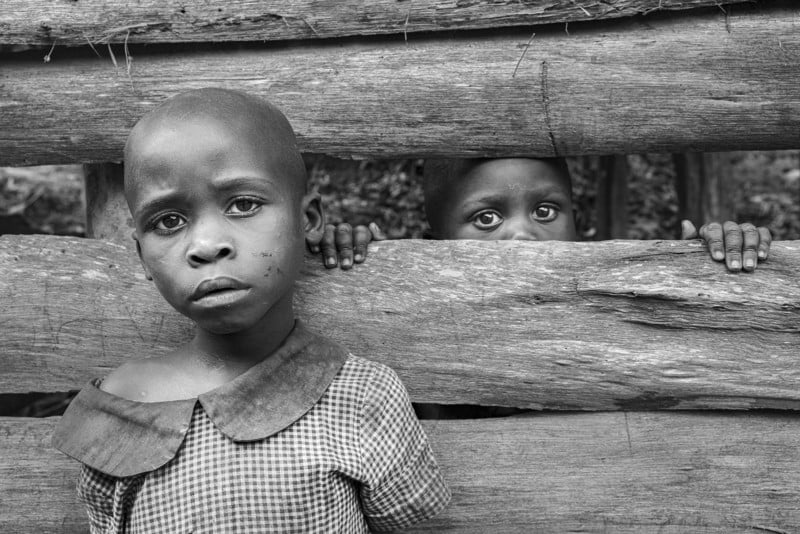
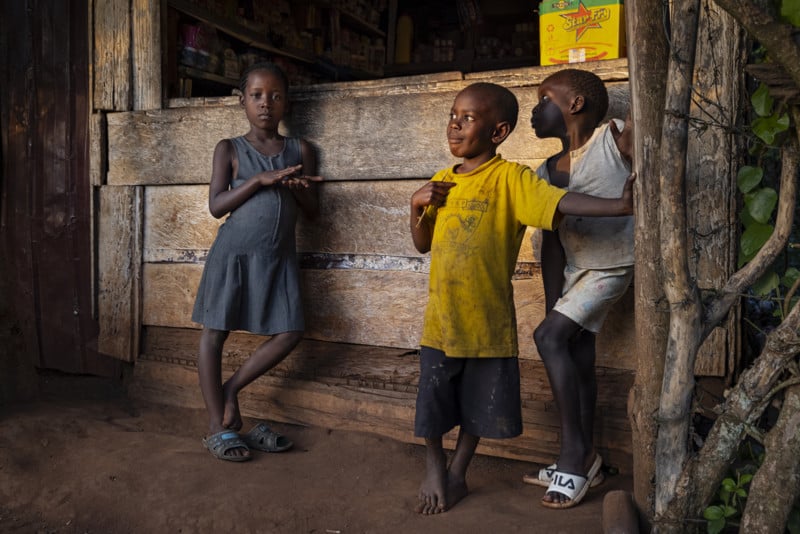
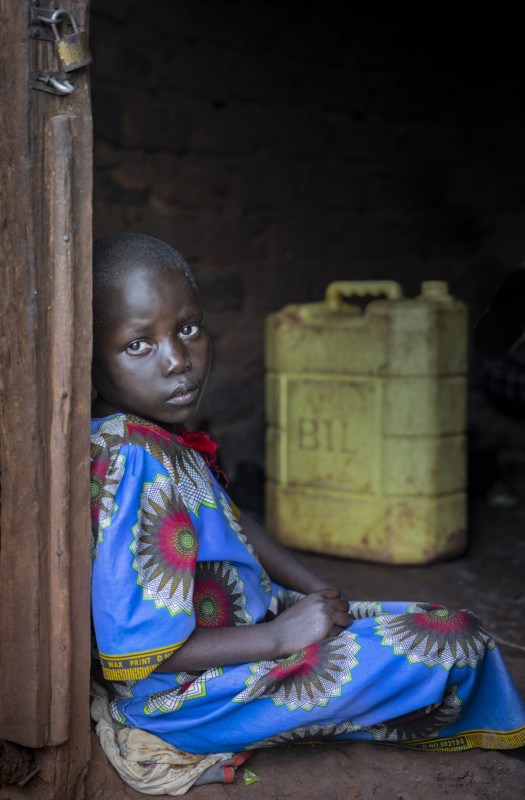
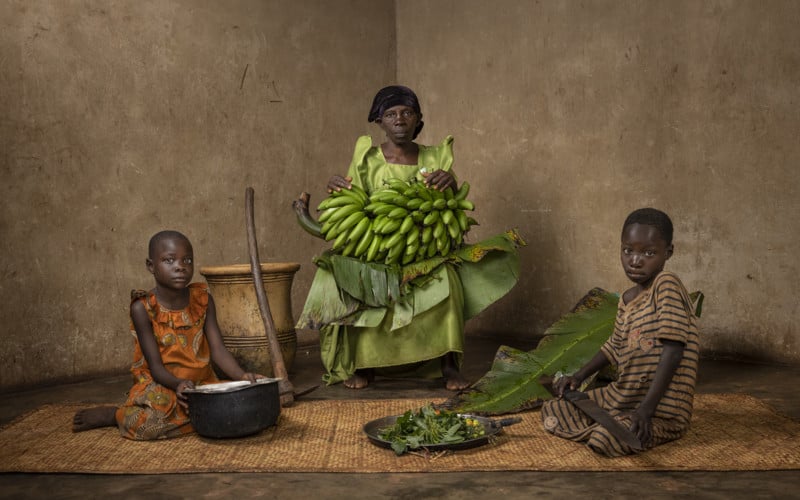
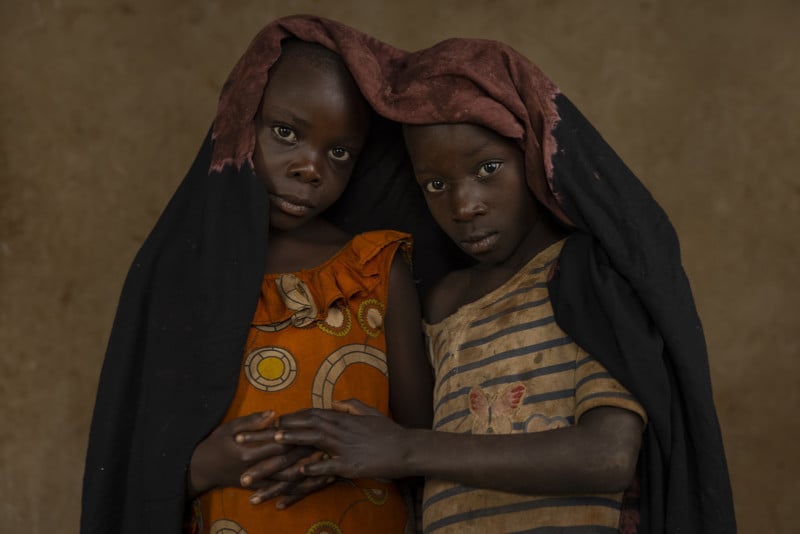
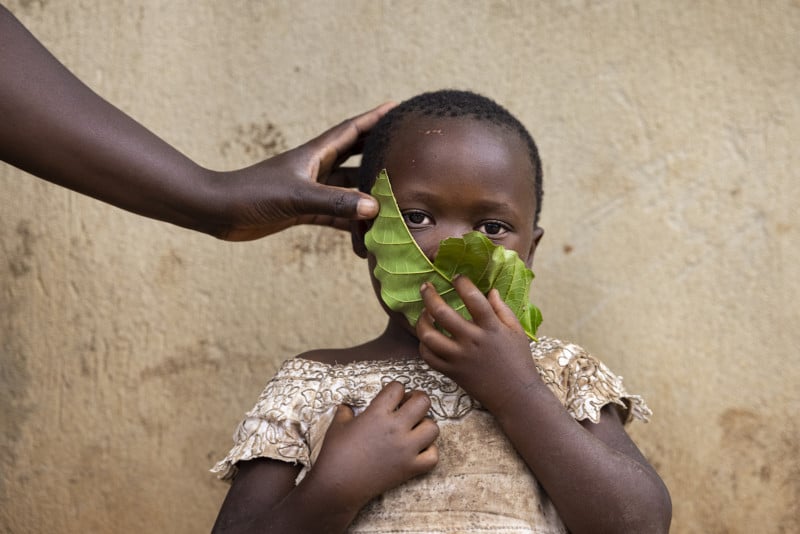
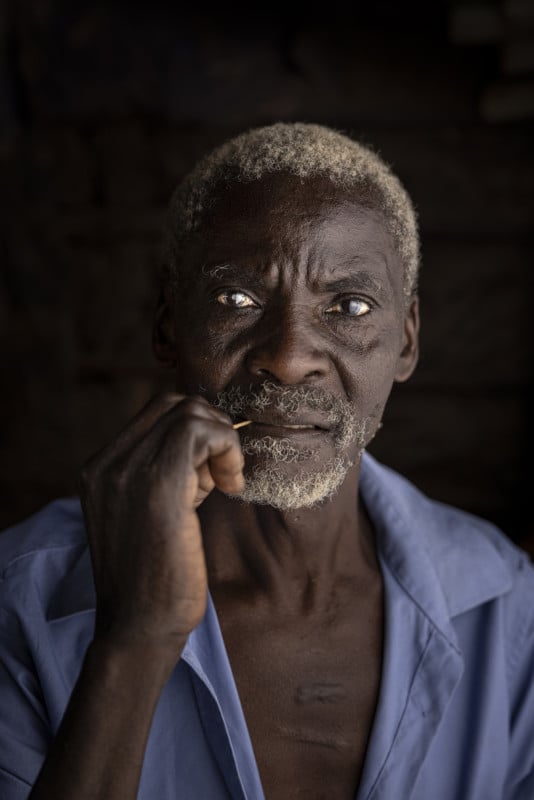
After a day of walking around without a camera, humoring the local guides by visiting places they wanted to show me (but that I had no actual interest in), I found myself gravitating towards wanting to photograph the children within the villages. Rural villages in Uganda have average life expectancies of below 50 years old, and with many children unable to access any form of education or healthcare it seemed appropriate to focus on the lives and emotions of the young, and how they perceived both me and the outside world. All that aside, I just wanted to observe and learn, and hopefully, impart some warmth and kindness where I could.
My photos in and around Bwindi reflect maybe more reportage or street photography than portraiture, but nonetheless, the experience certainly allowed me to ease into all the unseen facets that go into travel photography: exploration, research, getting to know subjects, putting subjects at ease, accurate translation, visualizing ideas, expressing ideas, directing, managing assistants, space, people, weather, light, narrative, etc. Usually, this takes a good day or two to mold, but I had to get straight into it and as such, I believe my street/environmental photos reflect that.
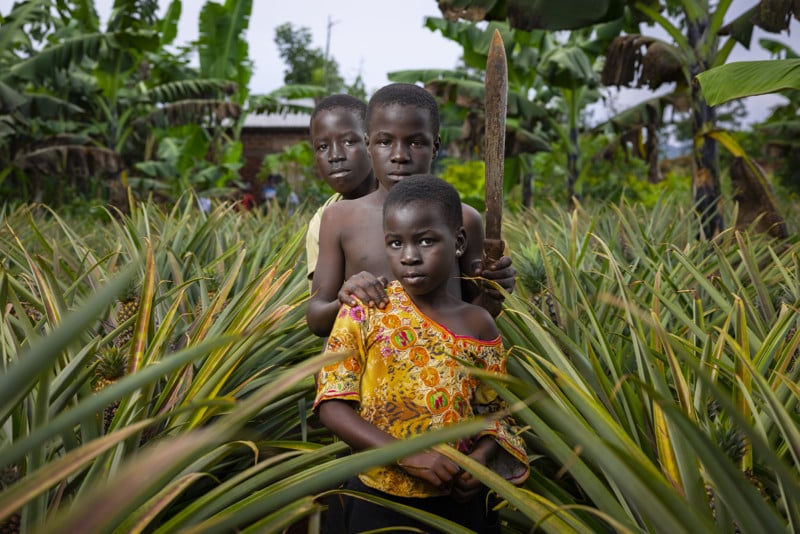
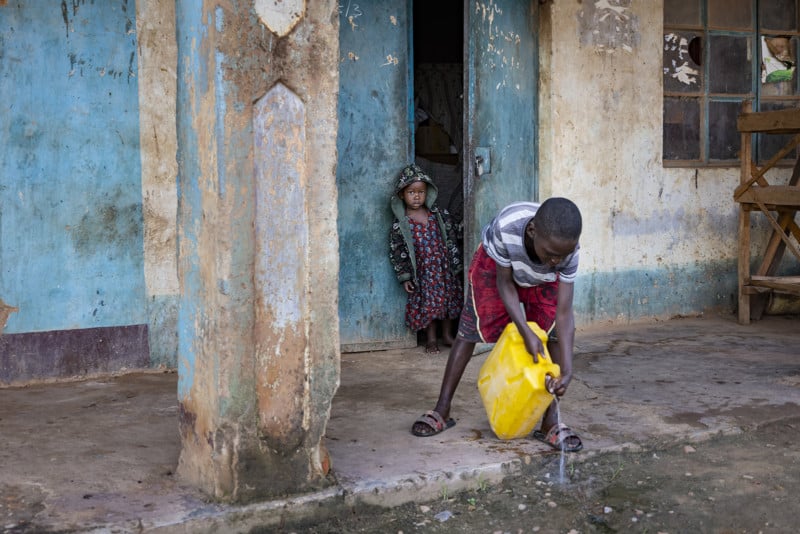
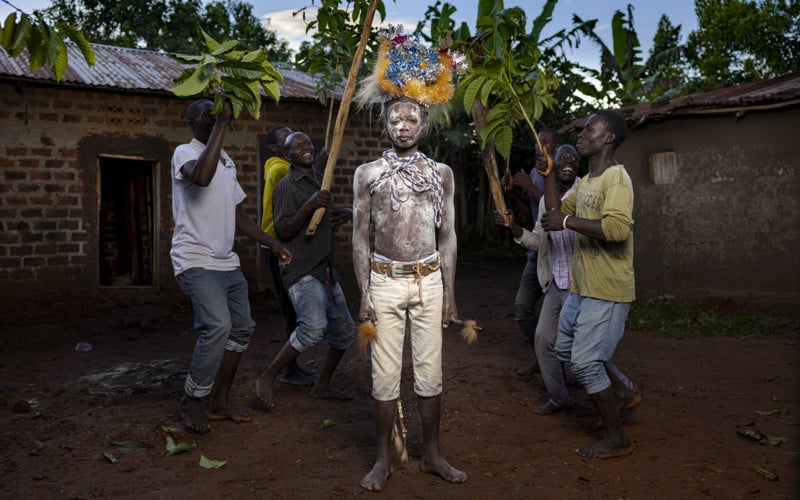
Once I got to Jinja, I had had my so-called “practice” and essentially landed in the middle of an array of villages near the huge Lake Victoria. Here I would spend three days (again, I wish I had longer) and the area’s own unique challenges presented themselves straight away. I lost most of the first day due to weather and poorly communicated (on my behalf) ideas, as well as almost being conned out of large amounts of money on previously agreed photo setups, subjects, and locations — word spreads quickly when a Mizungu comes into the area, especially as I was on my own.
At the end of the first day, I had nothing, so I took some time to clear up a few things with my guide and other local helpers. These types of debriefs are great over a drink at the end of a day and have to happen quite often when you are working with different people all the time (rather than taking your own crew with you).
You can see some of my lessons learned on my blog for Uganda, but the second and third days went smoother, even though there was plenty of rain to ruin what was “Plan A” of outdoor sunrise shots. Plans changed, and the photography became more enjoyable for everyone involved — people relaxed a bit more, they got to know me a bit better, they played with my camera and I printed them some photos. From then on, the trip went far too quickly and of course, I didn’t get nearly the amount of content that I dreamed of, but there is always next time! One’s favorite photograph is always the next one.
There were a few magical moments in just these few days that I will not forget. Although once again I was on my own, I didn’t feel alone when surrounded by the warmth of the local people. Throughout the whole 10 days, I was given so much hospitality and kindness from those that had nothing but a torn shirt on their back, and for that — as well as some of the unforgettable people I met and managed to photograph — I thank them, as well as all of those that helped me get the content that I am proud to publicize.
If you want to see a bit of footage from behind the scenes please watch my video, read my blog or purchase my book, all of which are linked on my Uganda project page. Feel free to send me a message to ask any questions about the project, or indeed anything at all, I’d love to hear from you!
About the Author:Matt Jacob is a photographic artist who specializes in capturing the evocative, dynamic, and complex lives of various subjects whose stories grab his attention. With a focus on authentically encapsulating a moment from all metaphorical angles within a photograph and a deeper story over a collection, Jacob has dedicated his passion to truly understanding the essence of different perspectives, as well as understanding the “why” behind various forms of human nature. He believes a fearlessness in beholding his subject’s story is what makes his photographs unique. To this day, he relentlessly pursues the capturing of untold stories of unfamiliar life.