Tuesday, August 31, 2021

Tokina SZX 400mm f/8 Reflex Review: A Challenging But Fun $250 Lens

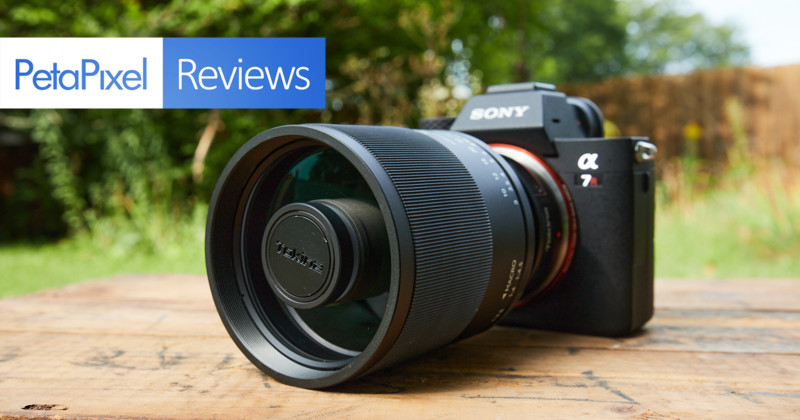
Remember when lenses had character? Tokina remembers. Last year, it released the SZX 400mm f/8 reflex lens which oozes personality that most modern lenses miss out on — it’s a tiny but mighty telephoto lens.

While Tokina originally announced the lens in July of 2020, it recently also added support for Canon RF and Nikon Z mounts, making it available in just about every major popular lens mount outside of L-mount.

As a preface, the Tokina SZX 400mm f/8 is what’s called a mirror lens or a reflex lens (or if you want to sound like a real nerd: a catadioptric lens). This general design has been around for a very long time, going back to the 1800s when it was first developed for microscopes. With regular photography lenses, the light enters and travels down the optical path right to the camera’s sensor. For reflex lenses, the path is folded by an internal mirror which makes it possible to have long focal lengths contained in a relatively small housing.

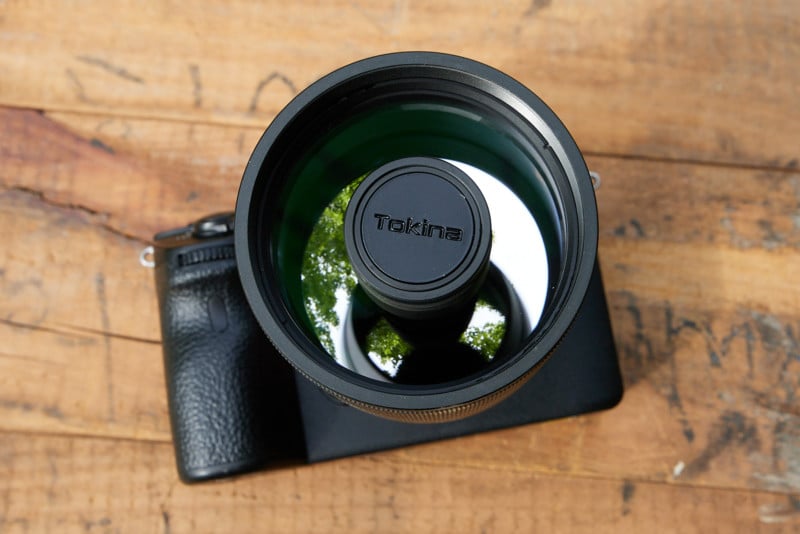
Most all of these lenses, including this SZX 400mm, do not have autofocus and are manual focus only. They also all have a fixed aperture. That means that this f/8 lens is only an f/8 lens and cannot be stopped down further without the use of neutral density filters or other external means. Finally, they have a weird-looking front glass element because of the mirror system inside. This round shape that sits in the center of the lens shows up in the out of focus areas of a photo for a distinct look that we’ll see below.

Build Quality and Design

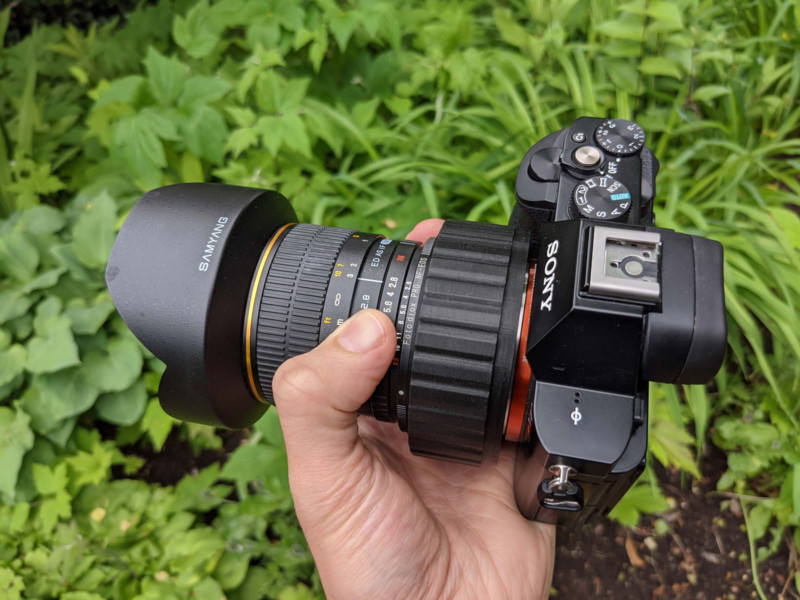
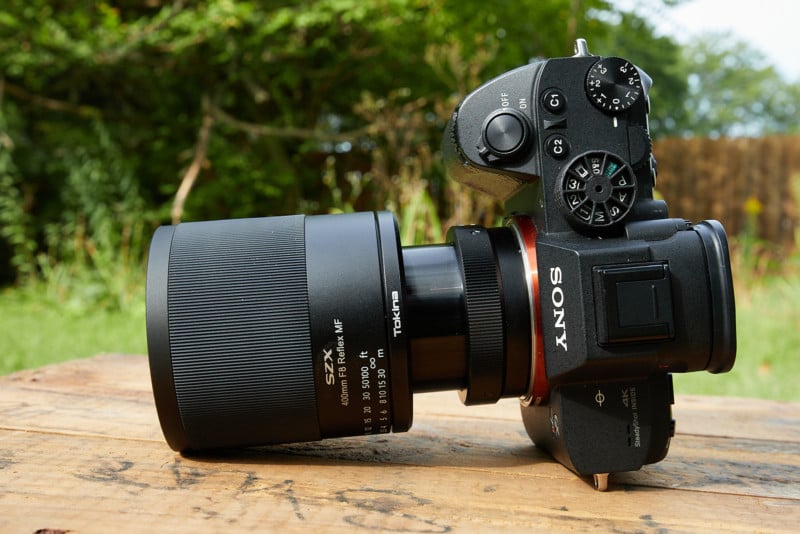
Owning a 400mm lens usually comes with limitations on where it would be comfortable to bring along. You wouldn’t necessarily want to casually take it on a dog walk where photography is not the primary focus, for example. Yet, the Tokina SZX 400mm to me does not reach the threshold of being a burden on almost any occasion. It’s quite small — about the size of a standard 24-70mm f/4 lens — and also very lightweight at just 12.5 ounces (354.4 grams). It’s a carry-everywhere type of lens, but it’s also got heavy firepower with that 400mm reach. That’s an exciting combination.

Looking at the full lens, we see a very simple metal construction on the outside. Virtually the entire lens rotates and acts as the focus ring, but there is a wide strip of rubber as well to allow for a better grip. The focus ring twists a very smooth 270 degrees that you’re either going to love or hate. While it allows for gentle, precise movements, it pays for this by being slow to focus greater distances.

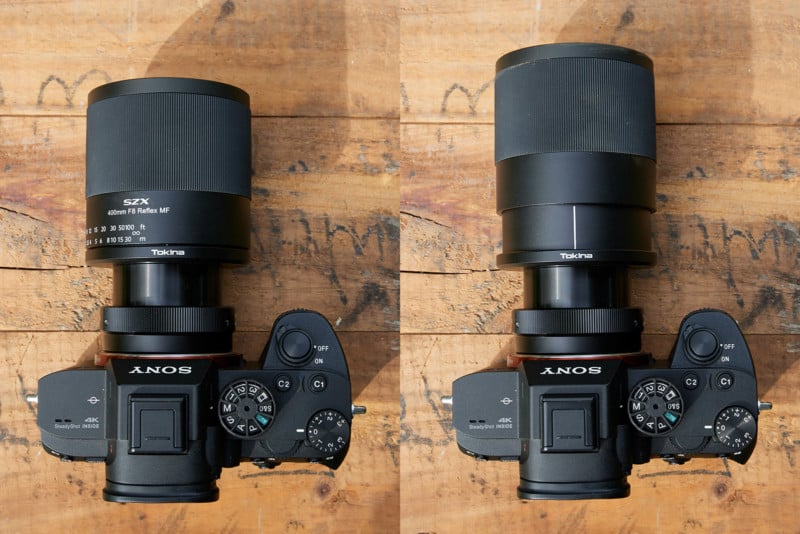
For wildlife, I found it to be irksome having to twist so much in order to focus from subjects near to far and back again — I cannot sweep the focus range in a single twist of my left hand while holding the camera steady in the other. As the focus moves from infinity toward the close focus distance of 3.77 feet (1.15 meters), the physical length of the lens also extends out up to around 0.75 inches (1.91 centimeters).

Left: Lens at infinity focus. Right: Lens at close focus distance.

Another point that I think many will agree with me on is that the lens hood design is not good. The metal hood screws right onto the lens’s 67mm filter threads and creates a few problems in doing so. For one, the lens hood cannot be reversed and attached to save room in the bag. Instead, it will need to be wrapped unsecured around the lens. Secondly, when the lens hood is attached, that means the supplied lens cap cannot be clipped on at the same time. Thirdly, one cannot use filters and the lens hood at the same time as they require the same threading.

On a positive note, Tokina designed the SZX 400mm to have interchangeable camera mounts. That’s right: the camera mount end can unscrew off and be replaced with any of the other supported mounts that are sold separately. For this review, I’ve been using the Sony E-mount version. However, if down the line I get into the Canon mirrorless system, I simply purchase the $29 RF mount, swap them out, and the lens comes with me. Mounts are available to be purchased independently for Canon EF and RF, Nikon F and Z, Fujifilm X, Micro Four Thirds, and Sony E.
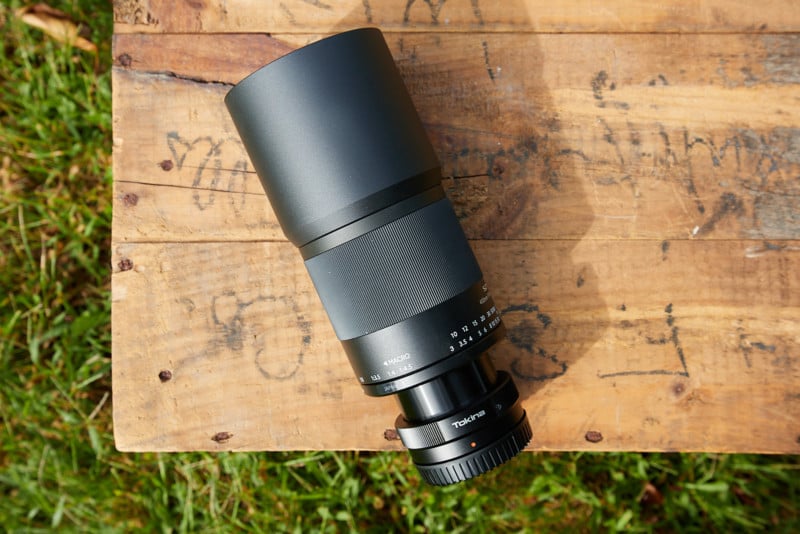
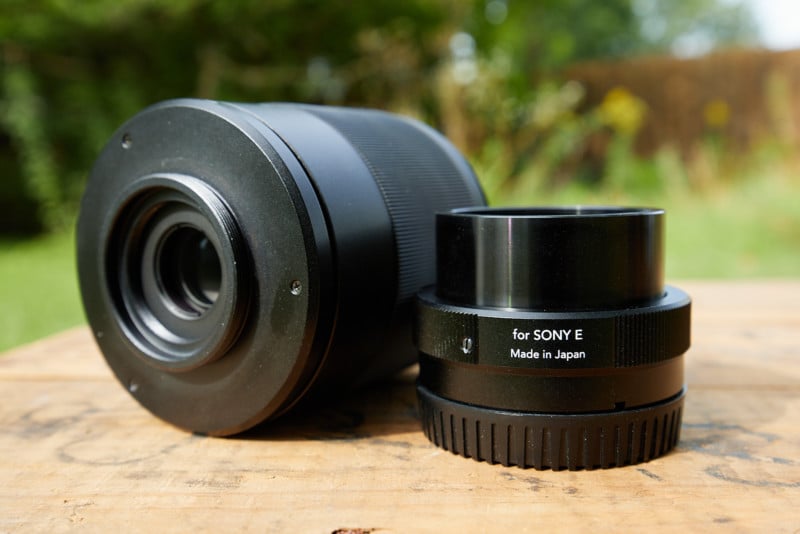
The removable camera mount can be replaced with other available camera mounts from Tokina.

Image Quality

Inside, the lens uses six elements in five groups and has multi-layered anti-reflective coatings. For a $250 400mm lens, the image quality ended up exceeding my expectations. I never assumed this lens to be wildly sharp with stellar contrast and clarity, and sure enough, it doesn’t go that far. That said, Tokina SZX 400mm holds up quite well for the cash spent. After some minor tweaking in editing to bring back contrast in photos, it’s hard to complain when that’s all it really needs.

One benefit typical to the reflex lens design is the elimination of chromatic aberrations. While other cheap photo lenses out there typically suffer from heavy color fringing, there is none to be found with this 400mm lens.

As for image sharpness, I felt that was more a matter of attaining accurate focus in the first place. It can be a difficult task to hit critical focus manually with 400mm at f/8. The fact that the lens naturally lacks some clarity also contributes to the difficulty in eyeballing it.

I quickly learned that the best way to ensure sharpness was to use the focus magnifier setting mapped to a custom button on my Sony camera and digitally punch in on the image to adjust focus as I’m firing away on the shutter. It’s not the easiest thing in the world for constantly moving subjects like birds, but it gets the job done with greater accuracy than focus peaking or eyeballing from the full-frame display.

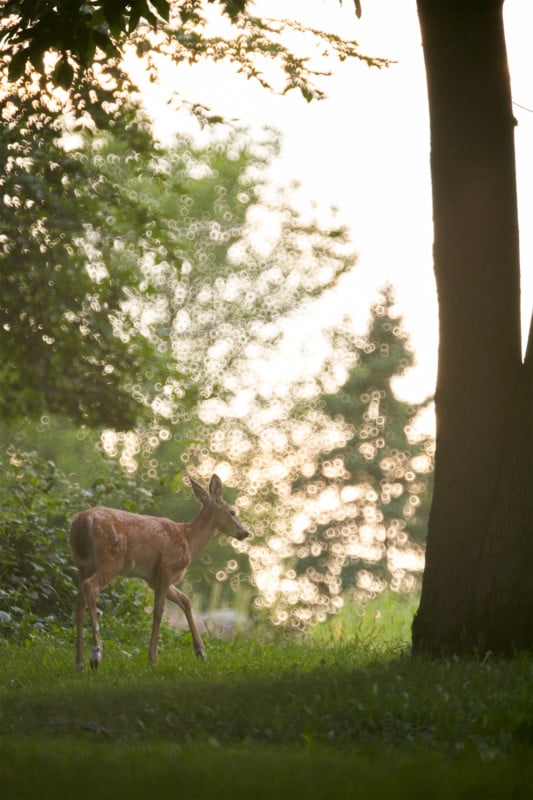
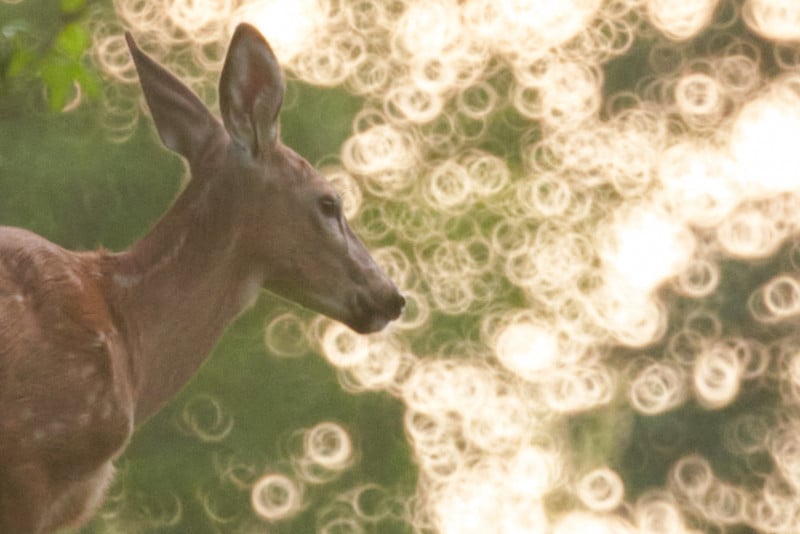
Lastly, we can’t talk about a reflex lens without bringing up one of its defining qualities: the bokeh. Since the lens features a round opaque structure set in the middle, this results in matching donut-shaped bokeh balls in out-of-focus areas of the image.

It’s busy, it’s strange, and it’s pronounced, but it’s also unique and fun and can give photos the extra spark needed to stand out in a positive way. Personally, I love it, but the trick is to really lean into the look and embrace it. If I shoot with the sun to my back and there’s flat lighting in the out of focus areas, it tends to not look flattering. On the other hand, shooting backlit and really trying to find out-of-focus backgrounds and foregrounds with scattered high-contrast light everywhere makes photos shine with a special, original look to them.

Previous image cropped 100%.

The Greater the Challenge, the Greater the Reward

This is not an easy lens to use, but that doesn’t mean it’s a bad lens. It’s actually quite fun to be challenged to find scenarios where the photos from this lens will pop because once you do, the results are magical. It’s also extremely handy to keep around since the size and weight means it can be tossed in any bag or left on the camera for whenever the occasion strikes to zoom in.

Are There Alternatives?

For $300, there’s the more expensive Rokinon Reflex 300mm f/6.3 ED UMC CS that can be purchased new for select camera mounts. It’s less focal length but also a fixed f/6.3 rather than f/8 like the Tokina.

Alternatively, since the mirror reflex lens design is more of a historical product in photography these days, there’s always the option to head to eBay and pick up one of the older designs and adapt them to a modern mount where possible. You can find 500mm, 600mm, and even 800mm f/8 reflex lenses out there for relatively cheap.

Should You Buy It?

Yes. For $250 and the ability to switch out camera mounts down the line, the Tokina SZX 400mm f/8 Reflex is a creative-use lens that’s worth the cost if you’re up for a fun challenge.

Hulking Attachment Gave Canon FD Lens Autofocus 40 Years Ago

The Canon Zoom Lens FD 35-70mm f/4 AF was a lens originally manufactured in 1981 and features an unusual motor system that allowed it to autofocus. In Kai Wong’s 13-minute video, he shows how it still works remarkably well even today.

Spotted by Fstoppers, the FD 35-70mm f/4 AF took Canon’s successful lens and added a large box above the lens which housed a mechanism that would allow for autofocus. It used Canon’s Solid State Triangulation (SST) system that originally appeared in the AF35ML compact camera that also launched in 1981.

According to a story on MIR, the SST mechanism used triangulation to measure shooting distance. The measurement is performed by observing a subject from two points, hence the two small lenses that are visible on the front of the large autofocus box of the FD 35-70mm f/4 AF. The two points were slightly angled so that incoming light rays that would bounce off a subject would come in and be triangulated by a small CCD image sensor inside the system. Canon describes it as such:

The SST method is a system in which information on the photographed object that enters the sensor through two fixed mirrors is converted into an electric signal and distance is measured by a microcomputer, with focusing performed by moving a distance ring with a motor. The latest fixed imaging device CCD (charge-coupled device) technology is adopted to provide high resolution and a broad dynamic range able to detect low to high luminance, making it less susceptible to the contrast and pattern size of the photographed object and enabling highly precise autofocusing. Also, as the SST method does not have a movable section in the distance measuring mechanism, no vibration or electric noise is caused, which provides high reliability fitting of a high-end SLR camera.

The system, as evidenced by Kai’s video above, works remarkably well. While he is using a mount adapter, at the time the lens was compatible with any Canon FD-mount camera, making autofocus something anyone with such a camera capable of upgrading to an autofocus lens.

Canon

The company would later use a similar system for the FD mount of the Canon T80 in 1985 which was able to autofocus with one of three lenses that had integrated autofocus motors. Canon would eventually abandon autofocus on the FD mount as it moved towards the EOS system in 1987.

While the system clearly works well, its implementation on the 35-70mm f/4 lens has a clear downside: it’s huge and bulky. While it isn’t particularly heavy, it is a cumbersome addition to a camera system that would have normally been much smaller and easier to transport. While the technology behind the autofocus system still works, it has since been replaced with methods that are far more compact.

For more from Kai Wong, make sure to subscribe to his YouTube channel.

Sony Alpha 7R II Appears Finally Discontinued After 6 Years

According to the product listings from multiple retailers, the Sony Alpha 7R II has finally been discontinued after six years of production even though it had been technically replaced by both the Alpha 7R III and Alpha 7R IV in recent years.

As noticed by Sony Addict, the camera is now listed as no longer available by, for example, Adorama:

The camera is listed as an active product on Sony’s official website, however, though stock is limited. It is possible that, as was the case with the Alpha 9, dealers have marked the camera as no longer available or discontinued because they are no longer able to purchase additional inventory. If this is the case, any remaining stock of the camera will be the last available as new models.

The Sony Alpha 7R Mark II, which was known as the a7R II at the time before Sony quietly altered its naming conventions in the last year, was originally launched on June 10, 2015. It was the world’s first backside-illuminated 35mm full-frame sensor and was also capable of shooting 4K video.

The company touted that the camera had 399 phase-detection and 25 contrast-detection autofocus points that resulted in up to 40% faster autofocus performance. The updates to the autofocus algorithm made the camera capable of following action and keeping it sharp much better than the original a7R, and while it struggled with processing those high-resolution images without collapsing under the weight of the data and it still had battery life issues, it was still the best camera Sony had ever made.

Mount Jefferson, Copyright Jaron Schneider | Photo captured on the Sony Alpha 7R II

While Sony would continue to manufacture and sell the Alpha 7R II for six more years, the company would also launch its successor and that camera’s successor in that time.

The Alpha 7R III was announced in 2017 and improved on the formula yet again, this time making long-standing complaints in mirrorless about battery life, processor performance, and autofocus speed completely irrelevant as the camera continues to be one of the better options a photographer can purchase even four years later.

In July of 2019, Sony announced the Alpha 7R IV, the world’s first 61-megapixel full-frame camera that again took everything that the previous model did well and made it even better.

Despite those improvements, it was argued that even though it had been superseded by a newer version, the Alpha 7R III was still the smarter buy. 61-megapixels is a lot, and few photographers need that kind of resolution.

While Sony has a history of maintaining the availability of older camera models at a lower price than new options for years after a replacement has been announced, its relative age and the ongoing parts shortage may have been responsible for Sony finally waving goodbye to the Alpha 7R II. In early August, Sony also discontinued the original Alpha 9.

Should Sony provide more information about the Alpha 7R II, PetaPixel will update this article accordingly.

A Variable 3D-Printed Extension Tube for Wide-Angle Macro Photos

Photography enthusiast and camera tinkerer Nicholas Sherlock has created a new 3D-printed variable length extension tube for macro photography using wide and ultra-wide lenses.

The tube, which extends from 0 to 35mm, allows Sherlock to use his 14mm and 35mm wide-angle Canon EF/EF-S DSLR lenses on his Sony mirrorless camera and focus those lenses from infinity all the way to 1x magnification.

The tube at minimum 0mm extension.

“Shooting wide is a great way to include more of the subject’s natural environment in the background,” Sherlock tells PetaPixel. “The only struggle is that they end up just millimeters away from the lens!”

All the printed parts that go into the tube.

The 3D-printed tube weighs in at just 95 grams (~3.35oz), making it easy to use for long stretches of time.

“I’ve focused on creating a lightweight rig so I don’t have to be a strongman to shoot for longer than 5 minutes,” Sherlock says. “The printed tube is 95 grams, and my Sony a7R mirrorless camera is much lighter than my previous Canon 5D Mark III.”

The design takes advantage of the 26mm difference between Canon DSLR deeper lenses and Sony’s mirrorless camera mount.

“This means that as long as my tube collapses down to 26mm or shorter, it has an effective minimum extension of 0mm, so the lenses can still focus to infinity,” Sherlock writes. “At max extension, a 35mm lens will reach 1x magnification.”

The variable nature of the tube opens the door to a wide range of possible lenses.

“It also means that I can produce tiny extensions like 7mm that would otherwise be impossible when using Canon lenses on a Canon body,” Sherlock continues. “These tiny extensions enable macro even on ultrawide lenses like my Samyang 14mm (although the lens ends up just millimeters away from the subject!)”

Here are sample macro photos captured with the help of the extension tube:

If you’re interested in printing out one of these extension tubes of your own for your EF lenses and Sony cameras, you can download Sherlock’s design files over at Thingiverse (instructions for building, mounting, and using the tube can be found there as well). Extra required parts include screws, nuts, and grease. If you’d like to go longer, Sherlock has also designed a 50-150mm tube that allows for magnifications of 1x to 3x when using a 50mm lens.

Sherlock previously created a 300mm extension tube as well as a rifle-style grip for that 5x macro rig. You can find more of his work on his website.

Timelapses for a Netflix Mushroom Documentary Took 15 Years to Create

Filmmaker Louie Schwartzberg has been creating timelapses of different fungi over the course of the last 15 years as part of his film Fantastic Fungi. In a video with Wired, he explains how he creates these epic sequences.

Fantastic Fungi is a 2019 film directed by Louie Schwartzberg that has been recently added to Netflix. Schwartzberg describes it as “a consciousness-shifting film” that takes viewers on an immersive journey through time and scale into the wild world of fungus that lives underground and is connected in a network that some argue can heal and save the planet. In it, Schwartzberg shows the vast variety of fungus, from those that are edible to those that kill, and from mushrooms that can clear oil spills to those that help trees communicate.

Through the eyes of renowned scientists and mycologists like Paul Stamets, best-selling authors like Michael Pollan, Eugenia Bone, Andrew Weil and others, we become aware of the beauty, intelligence and solutions that fungi kingdom offers in response to some of our most pressing medical, therapeutic, and environmental challenges.

In an interview with Wired, Schwartzberg reveals that he doesn’t create the sequences in his timelapses in ways that most people expect.

“I think the biggest surprise for people watching the film is that they think it’s all filmed outdoors,” he says. “There are a lot of reasons why you can’t film timelapses of plants and fungi outdoors. Number one: there is wind, which would make the object shake and rattle and look like a Charlie Chaplain movie. Number two: there are bugs and other elements that would interfere with filming.”

Schwartzberg says that in order to make his dreamy sequences, the light has to be constant. Outdoors — even during the day — the light fluctuates. In order to fully control his shots, he built a studio on top of his garage. Even in a controlled environment, getting his shots is complex and time-consuming.

“I am shooting one frame every 15 minutes, that means I’m shooting four frames an hour, times 24, is 96 frames. 96 frames is four seconds of film,” he explains.

Schwartzberg has a custom intervalometer that not only triggers his camera but also his grow lights as well as his photo lights, which he uses to create his scenes. He is able to program the lights to mimic different times of day. The reason he needs to have his grow lights connected to the intervalometer is that he needs to simulate a real environment. If the lights are on all the time, for example, the mushrooms will die.

Because the mushrooms are always expanding during their growth, Schwartzberg has to imagine his composition and framing before they rise out of the ground, which complicates the process further.

“I would say roughly the ratio of success to failure is about one out of six, maybe one out of ten,” he says. “It’s extremeluy difficult to do.”

For more from Louie Schwartzberg and the film, make sure to visit the Fantastic Fungi website or stream the movie on Netflix.

How to Do Top Back Lighting in Product Photography

I’m photographer Jay P. Morgan from The Slanted Lens, and in this article and 10-minute video, we’re going to talk about my favorite lighting when it comes to lighting any kind of product: top back light.

Our camera is generally in front of the food, and what do we do with our lights? We usually put our lights right next to the camera. It’s the place that makes the image, the product, the things on our set look the most flat and the most uninteresting.

I’ll share what each of the lights in my top back lighting setup does so you can set it up yourself.

First off, we’ve got our Westcott large softbox that’s the 3’x4’ in the back. It’s just behind the background so that at that angle it’s not going to light the background.

The softbox is throwing some pretty significant shadows forward. You see it underneath the little bowls. You see it on the limes. They have very strong shadows coming forward. You see it under the bowl in the back. You get strong shadows because the light is fairly low.

So for my background, I literally took the table that usually sits in our corner and set it on a couple of chairs in the foreground and apple boxes and stools in the background, and that became our background.

You could say, “okay I’m done, let’s shoot,” and that would be great, but is it done? No, it’s not done.

There are several things we can do to it, but the first thing is, I love mixing the quality of light. The next light I have is an Intellytech Light Cannon. It’s got a Fresnel lens on it. This is a directional and harder light and you’ll see it in our main image. The minute it came on, we see highlights in the salsa. We see highlights on the tomatoes. We see highlights in an area. I don’t have it covered in the entire scene.

I have it just raking across the salsa in the back because in the little video move we did, our goal was to end up on top of the salsa. That was our hero and so that’s where I put the raking hard directional light. That gave us just a really beautiful light on the salsa and the objects in the back.

I didn’t want to just put it everywhere because pretty soon now it just becomes uninteresting. But if you just create a little shaft in an area it makes that area more interesting. You could now go in there and put a mirror and bounce a little light in on the side of the bowl. You could come in and just with mirrors, and people put them on things.

So soft light first, then hard light to create some areas of emphasis. And now we want to see some depth in the background.

Another light I use is the Litra Studio Pro light. With this light, I have a piece of diffusion back there so that it would diffuse the light.

My backdrop is a very reflective surface, so I just want a little bit of light back there to give me some horizon. We see just a little bit. It’s almost too much.

In fact, it was too much in the middle, so I brought it over a little more behind the onion.

Now as I look at this scene, that onion in the back is very, very pronounced. It’s light-colored. I’m getting a really hard kick on it from that Fresnel directional hard light. That Fresnel light in the back is really hitting that onion pretty hard from the camera right side, so I’m going to flag that Fresnel light off and I’m going to cut it off from the onion.

Even though I have set a hard light, and my hard Fresnel light is really giving me pools of light, don’t be afraid to cut it off from different areas that may become too pronounced. Too prominent and you want them to recede a little more. So you start getting cards or maybe a piece of netting so that it can just take it down a little bit and not just knock it off completely.

So now I’m looking at this now thinking you know what, this is looking pretty good. But the last thing to do with this is to just simply bring up the shadows or the floor. You use those terms, I use those terms interchangeably.

The floor is just the amount of light that opens up the shadows but does not create its own shadow. If I put a light right in there to open up the shadows, that light will create its own shadow, and then I’ve got a whole new problem — it looks like there are two light sources. So instead, I’m going to just bounce our large soft light back into the shadows. And I do this with two different V-flats.

I used little inexpensive foam board V-flats that I bought from a dollar store for like $1.30. I tape two of them together. They’re black on one side and white on the other. I can use it to reflect or just subtract light, and they’re very easy to work with. These are the last two cards I set just about every time.

If I don’t want the floor or the shadows to be too bright, I may only set one. If I want the shadows to be fairly open I’ll set two.

I put my V-flats to the sides where the angle of view is always on a triangle off from the camera. It gets narrow on the front and deeper at the back, obviously, so I’m going to put the V-flat on that angle of view. I’m going to slide it in as close as I can get it to my lens. And the large white vertical card now is going to start to bounce light into all of the shadows from its side.

Will it open up the shadows on that side? Nope, not going to do that. That’s why I’m going to add a second card on that other angle of view.

Adding my second fill card to the other side and sliding it right on that angle of view up to the lens opens up all the shadows.

It becomes now a matter of really creative choice. How open do you want the shadows to be? You make that decision depending on how you bring these cards in or how you move them out.

I feel at this point like this is ready to shoot.

I feel like I’ve got nice raking hard light from that Fresnel lens on the right. I’ve got a great top back soft light that opens up and just draws and gives me dimension to all the subject matter. I’ve got great fill cards that open up the shadows.

And I’ve got that one card taking off light on the onion. If I was really working a scene like this and doing this for a major client, I would probably set up three or four mirrors and two or three cards cutting light off from different areas and really finesse this. Take a picture. Look at it in Capture One. Decide exactly what you want to change, what you want to work on. So this really becomes a starting point.

This is the point at which I would show this scene to my client and my client now would say, “Well I like this or I don’t like that.” And we would start working on the things that we do and don’t like. The hardest thing about this kind of setup right is controlling this many items in a scene.

It’s controlled chaos, getting things in in a way that gives them groupings and small simple areas design-wise. But the whole starts to work together.

Here are some photos captured with this lighting setup:

So there you have it: a look at top back lighting. I love this look.


About the author: Jay P. Morgan is a commercial photographer with over two decades of experience in the industry. He teaches photography through his company, The Slanted Lens, which runs a popular YouTube channel. This article was also published here.